How apps can become first-class citizens in Microsoft Sentinel
Many applications that are developed either as an in-house application or a SaaS offering often provide functionality that are useful or even essential for Security Operations Center to have insight into. So, how can we offer a direct integration into security solutions?

As I wrote about in Application-level monitoring and SOC when an application does not offer a easy way to integrate with the SIEM solution, it generates a bit of work.
Usually, the vendor will not go out of their way to offer this unless its a highly requested feature so they will defer to suggesting SOC integrate with their API.
I've also seen cases where these kind of SIEM-integrations are optional modules with a cost attached.
This post will focus on how application developers can easily offer a first-class integration with Microsoft Sentinel.
Here are some quick-jump links if you want to get straight into the action:
- What are Sentinel Data Connectors?
- Sentinel Connector Studio
- Sample application
- Creating the data connector solution
- Deploying the solution
- Pushing data from our application
- Seeing the data flow in
- Summary
Sentinel Data Connectors
Sentinel data connectors are modules that can be onboarded and enabled/disabled as needed. All of them are opt-in by default since logging typically cost money (except for a set of Microsoft built-in logs).
Keep in mind that even if you delete the connector, the data will remain in the workspace until the retention expires.
Sentinel has supported this for quite a while and is nothing new. Luckily, they have evolved from being complex to implement to more modern and low-code.
These two types - push being the newest and currently in preview - are:
- Codeless Connector (Push)
- Codeless Connector (Pull)
While older data connectors required implementing code and using a legacy ingestion API, these two are pure JSON configurations - hence: codeless.
| Connector Type | Description |
|---|---|
| Push | Provisions a ingestion endpoint and creates a service principal that can be used to push data |
| Pull | Periodically calls an API endpoint to retrieve data. Supports a set of authentication methods |
The benefit of the new push connector is that it allows an application to push events in real-time to Sentinel while the other, naturally, retrieves batches of events periodically.
This also means the push connector does not have to be exposed publicly (which would be needed for the pull connector).
Irregardless of type of data connector, they all have to be created as a solution package and you can have multiple data connectors per solution.
These solutions can include other things in addition to data connectors such as:
- Analytic rules
- Workbooks
- ASIM parsers
- Playbooks
This post won't go into this, but good to know.
In the end we'll end up with a package structure like this:
 └── ContosoSecurityAlerts/
      ├── Data/
      │   └── Solution_ContosoSecurityAlerts.json
      ├── SolutionMetadata.json
      ├── ReleaseNotes.md
      └── Data Connectors/
            └── ContosoSecurityAlerts_ccf/
                 ├── table.json
                 ├── DCR.json
                 ├── connectorDefinition.json
                 └── dataConnector.json
So, you can see there's a lot of JSON tinkering to be done.
Documentation for these two types of data connectors can be found here:


Sentinel Connector Studio
As I said, writing these solutions and structuring the package is a bit tedious, even if its not something you might do often.
So, I thought it would be useful to have a better creation experience and thus the Sentinel Connector Studio was born.
To see a complete example with both types of data connects, click the link below to open it in Sentinel Connector Studio.
![]()
The application can be run locally in Docker or can be accessed at here - it saves no data and runs entirely in the browser.
It supports saving and loading projects using JSON files that can be added to version control. Can be useful for when the application evolves and the data connectors with it.
Sample application
For sake of this post, we'll make a quick .NET application with dotnet new webapi which gives us a simple API that provides random weather forecasts.
Full sample can be found here.
And of course we'll want to add auditing of any access to this endpoint because - well, reasons.
What kind of fields might we want to log for auditing?
It varies depending on the nature of the application, but usually we can fall back to the good ol' military mission statement using the 5W's:
- Who
- What
- When
- Where
- Why
We'll turn that into fields that might look familiar - keeping it simple for demo purposes:
| Field | Type | Required | Default | Description |
|---|---|---|---|---|
userId |
string |
Yes | - | The identity of the user who performed the action |
action |
AuditAction |
Yes | - | The type of action performed (Create, Read, Update, Delete) |
entityType |
string |
Yes | - | The type of entity the action was performed on |
entityId |
string? |
No | null |
The identifier of the specific entity affected |
timestamp |
DateTime |
No | DateTime.UtcNow |
When the action occurred |
correlationId |
string? |
No | null |
An identifier for correlating related operations across requests |
We are using constants where we can (such as AuditAction.Read) so that data can more easily be filtered and queried over later.
Once you introduce magic strings, any analytics of the data becomes more troublesome so keep custom strings to additional data and make the 5 W's follow a strict standard as much as possible.
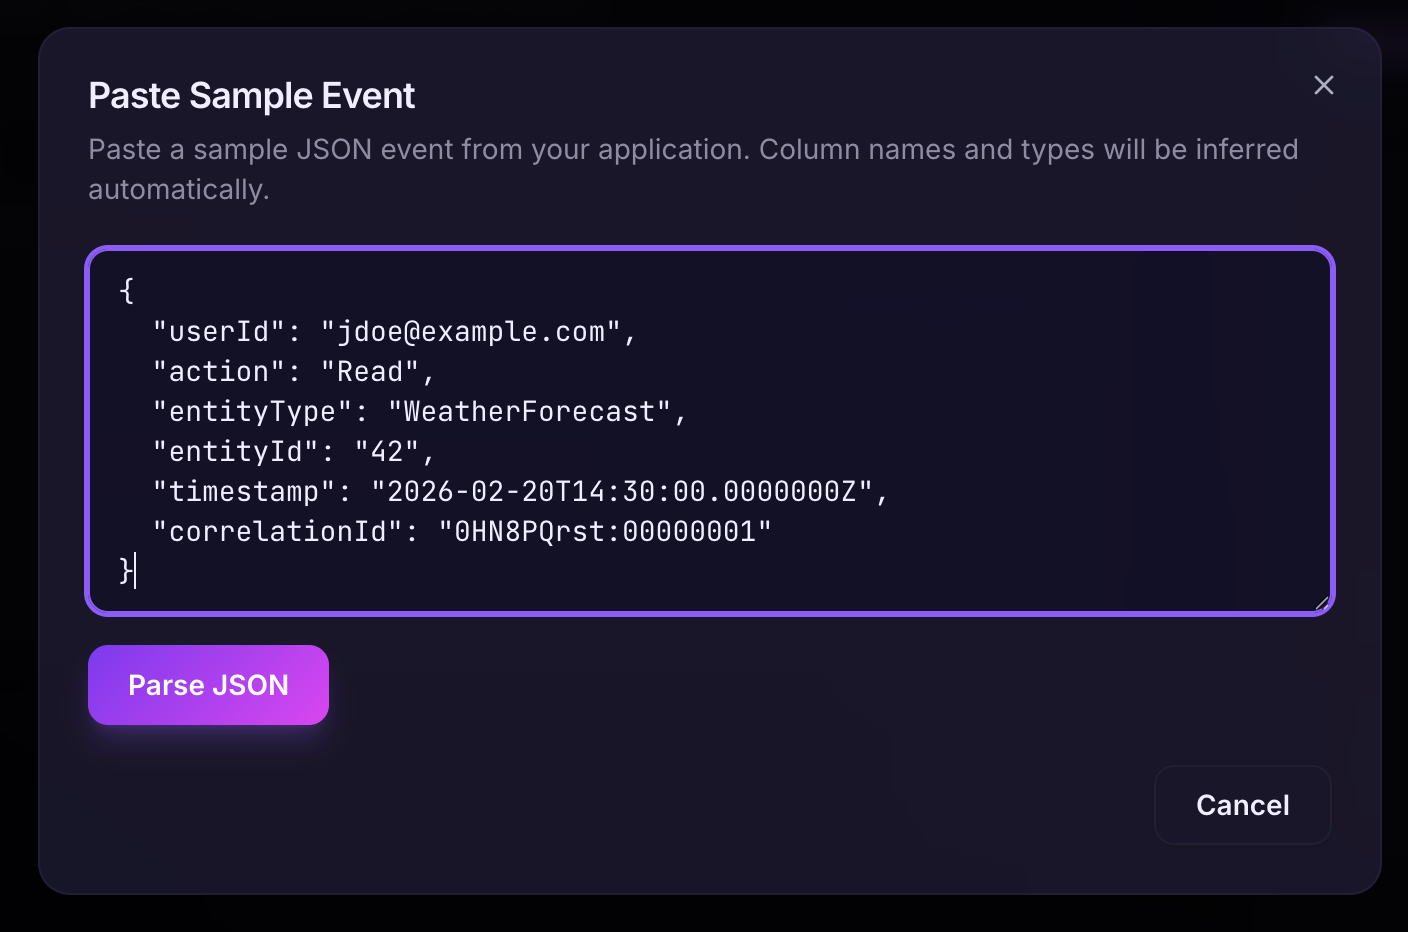
Here is how a typical audit entry will be represented in JSON format:
{
  "userId": "jdoe@example.com",
  "action": "Read",
  "entityType": "WeatherForecast",
  "entityId": "42",
  "timestamp": "2026-02-20T14:30:00.0000000Z",
  "correlationId": "0HN8PQrst:00000001"
}
Creating the data connector solution
Now that we know the shape of the data and what kind of data we want to feed into Sentinel, we can start building our data connector.
Either go to Sentinel Connector Studio or run it locally.
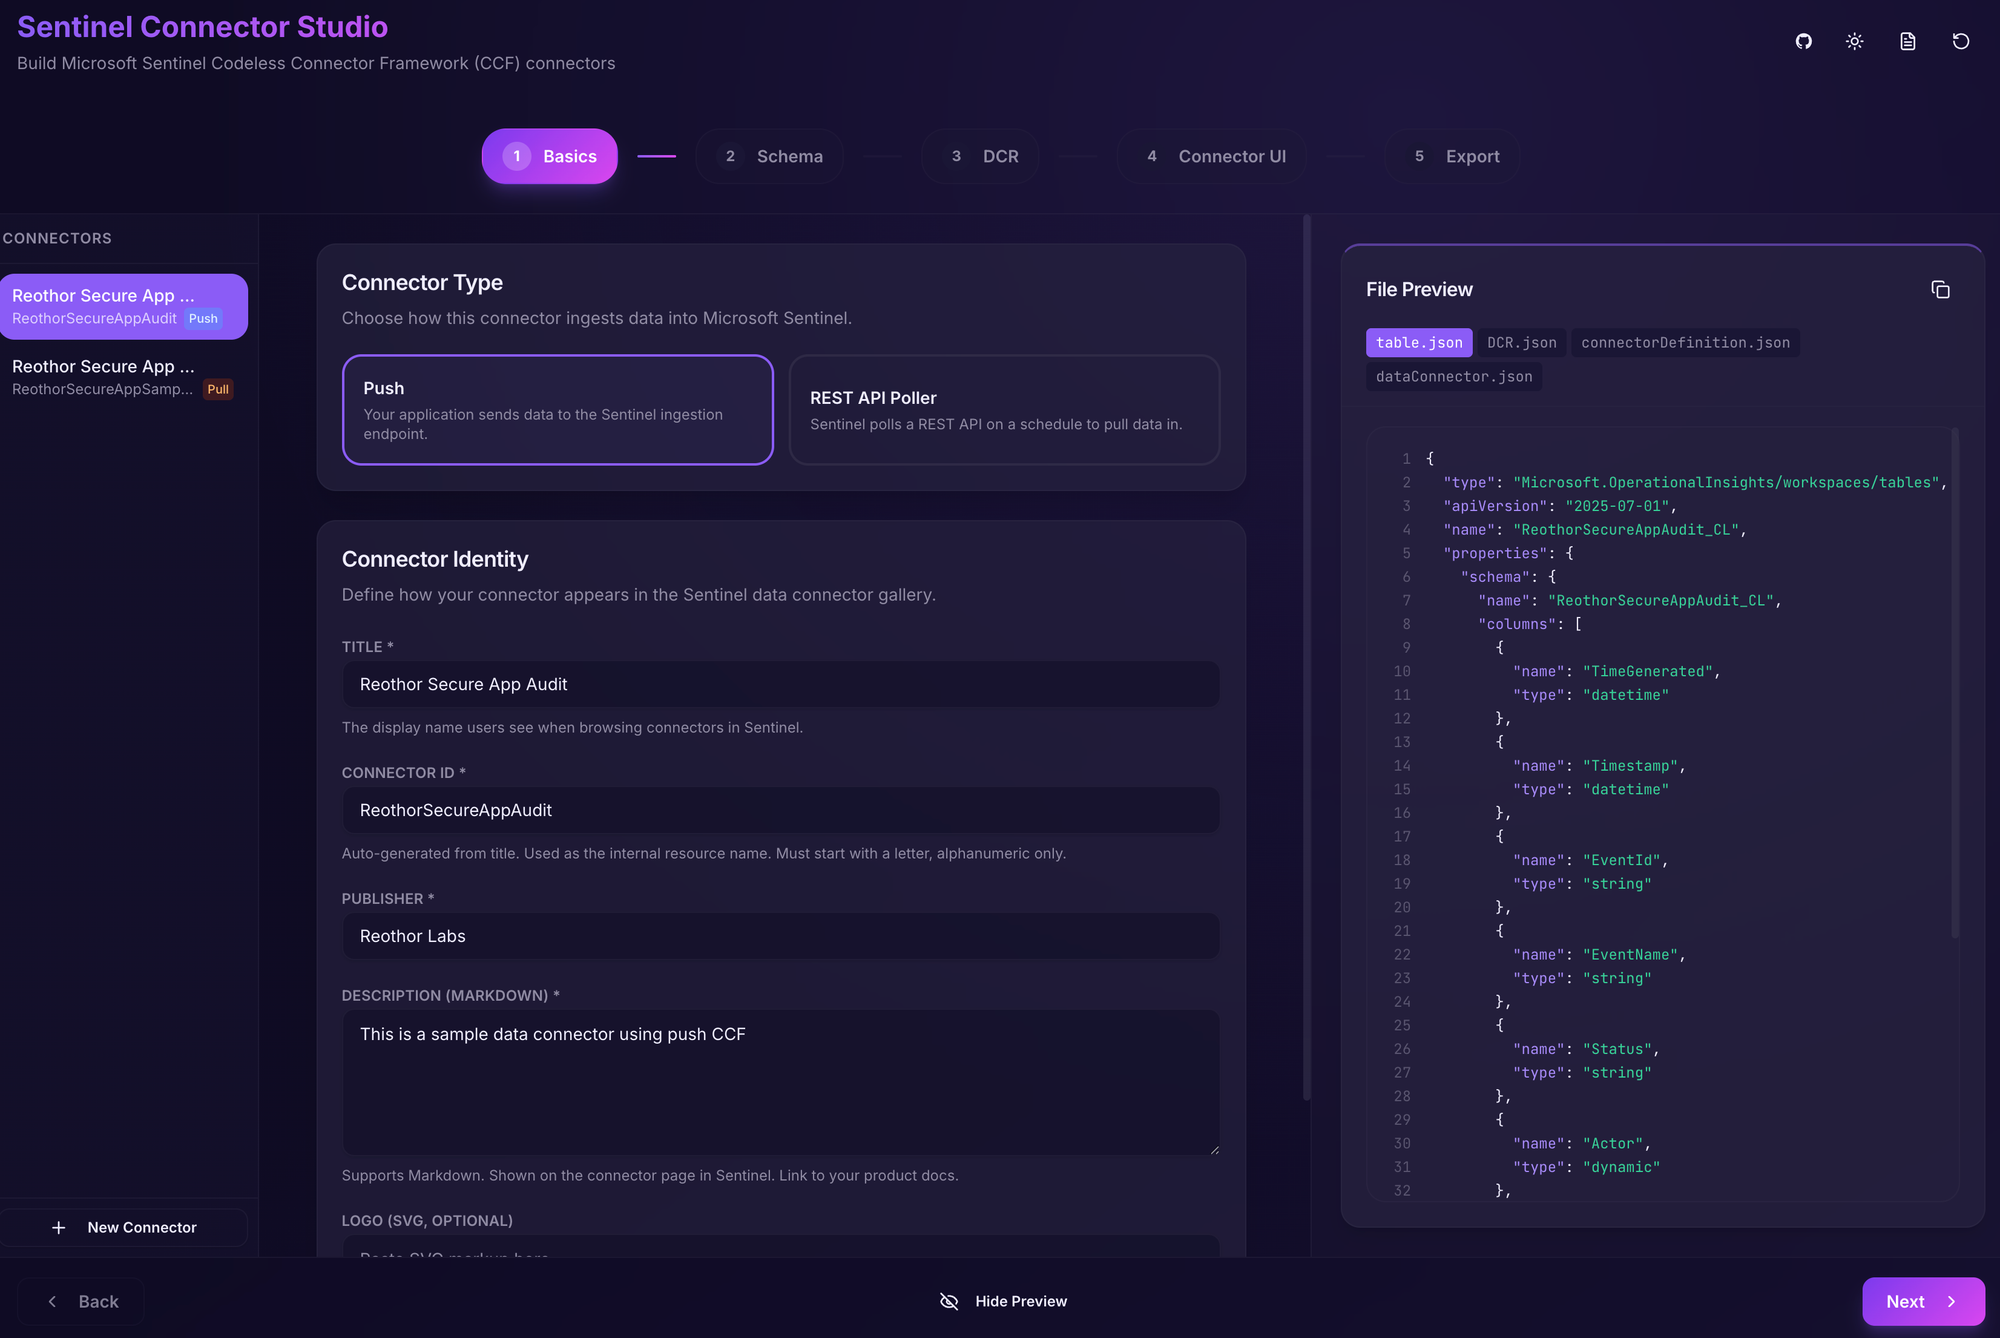
The first section is mainly which kind of connector we want to create (we'll use Push for this example) and some metadata.
At all times, we can see what the resulting JSON files will look like in the file preview on the right.
Fill in the fields like in the image below.
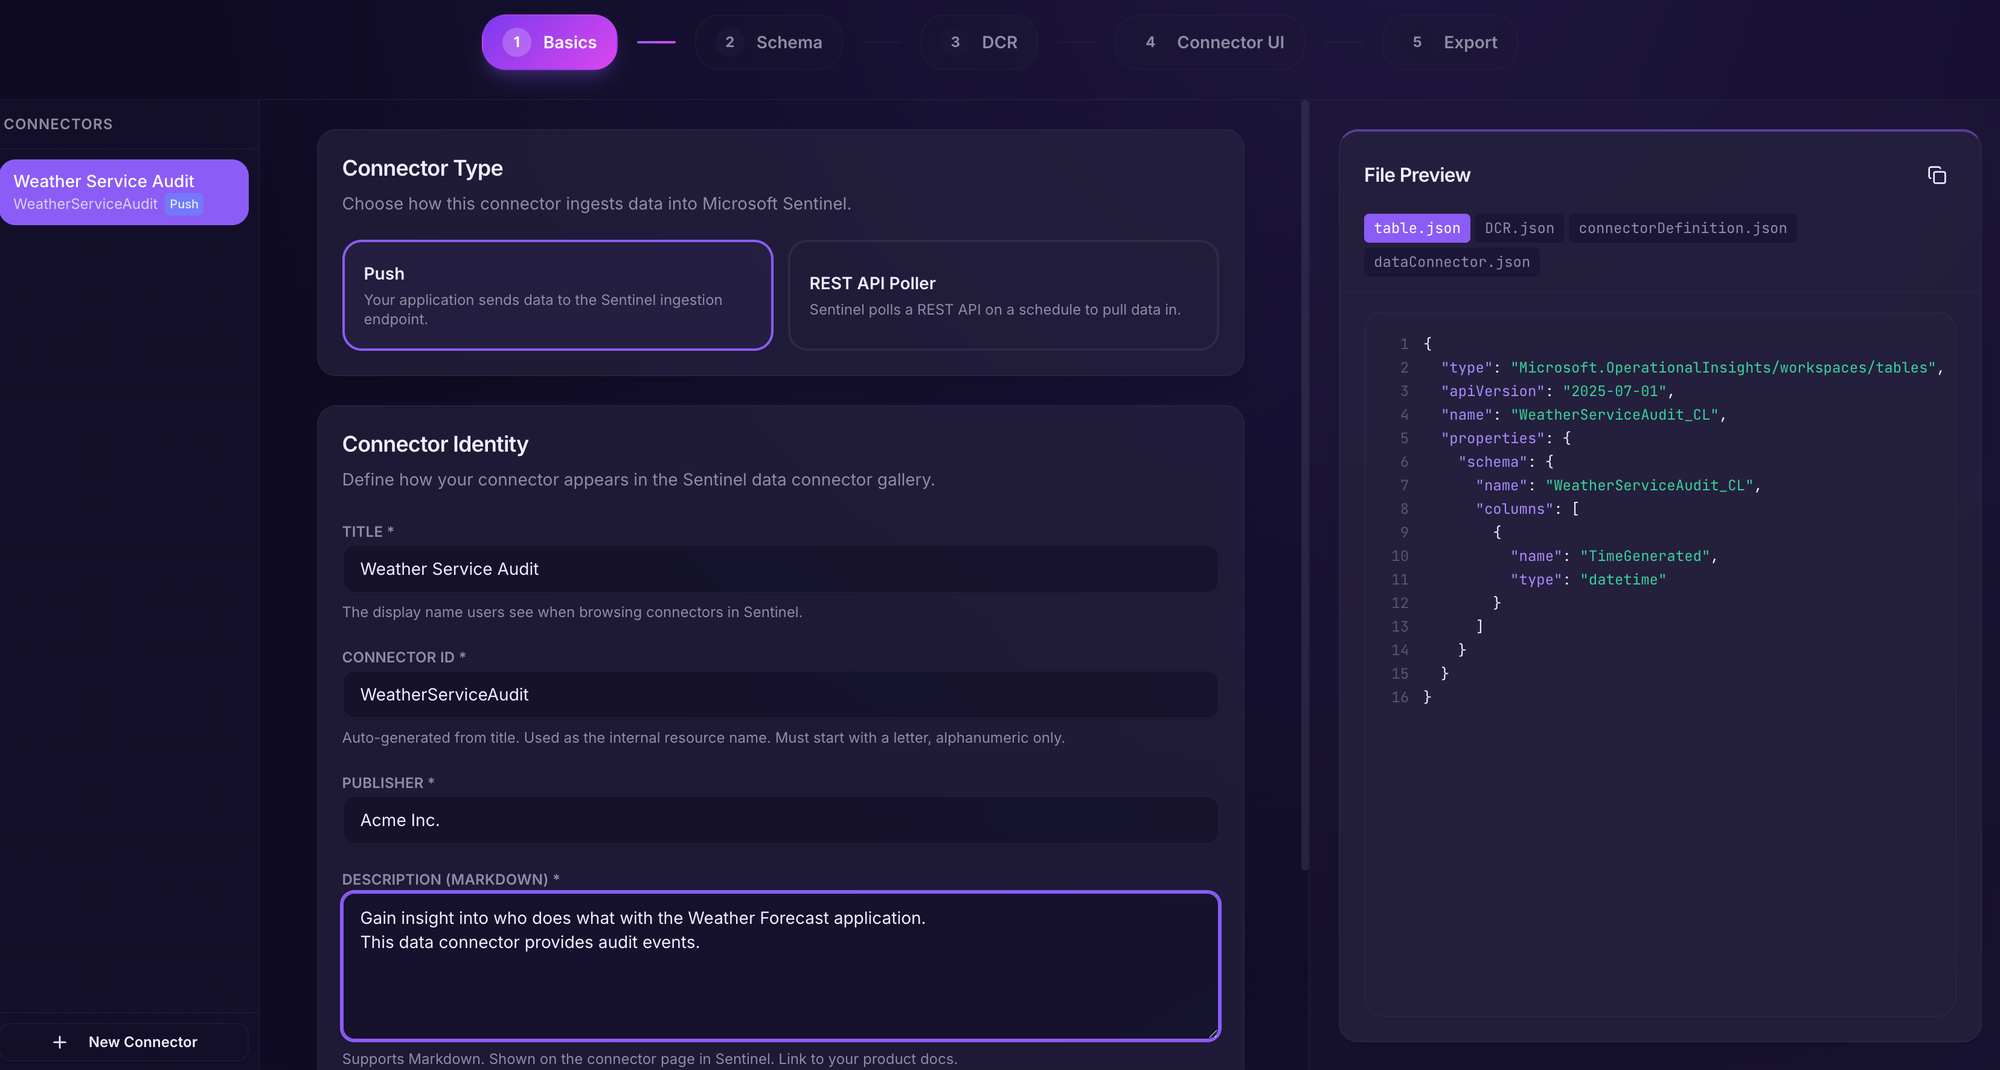
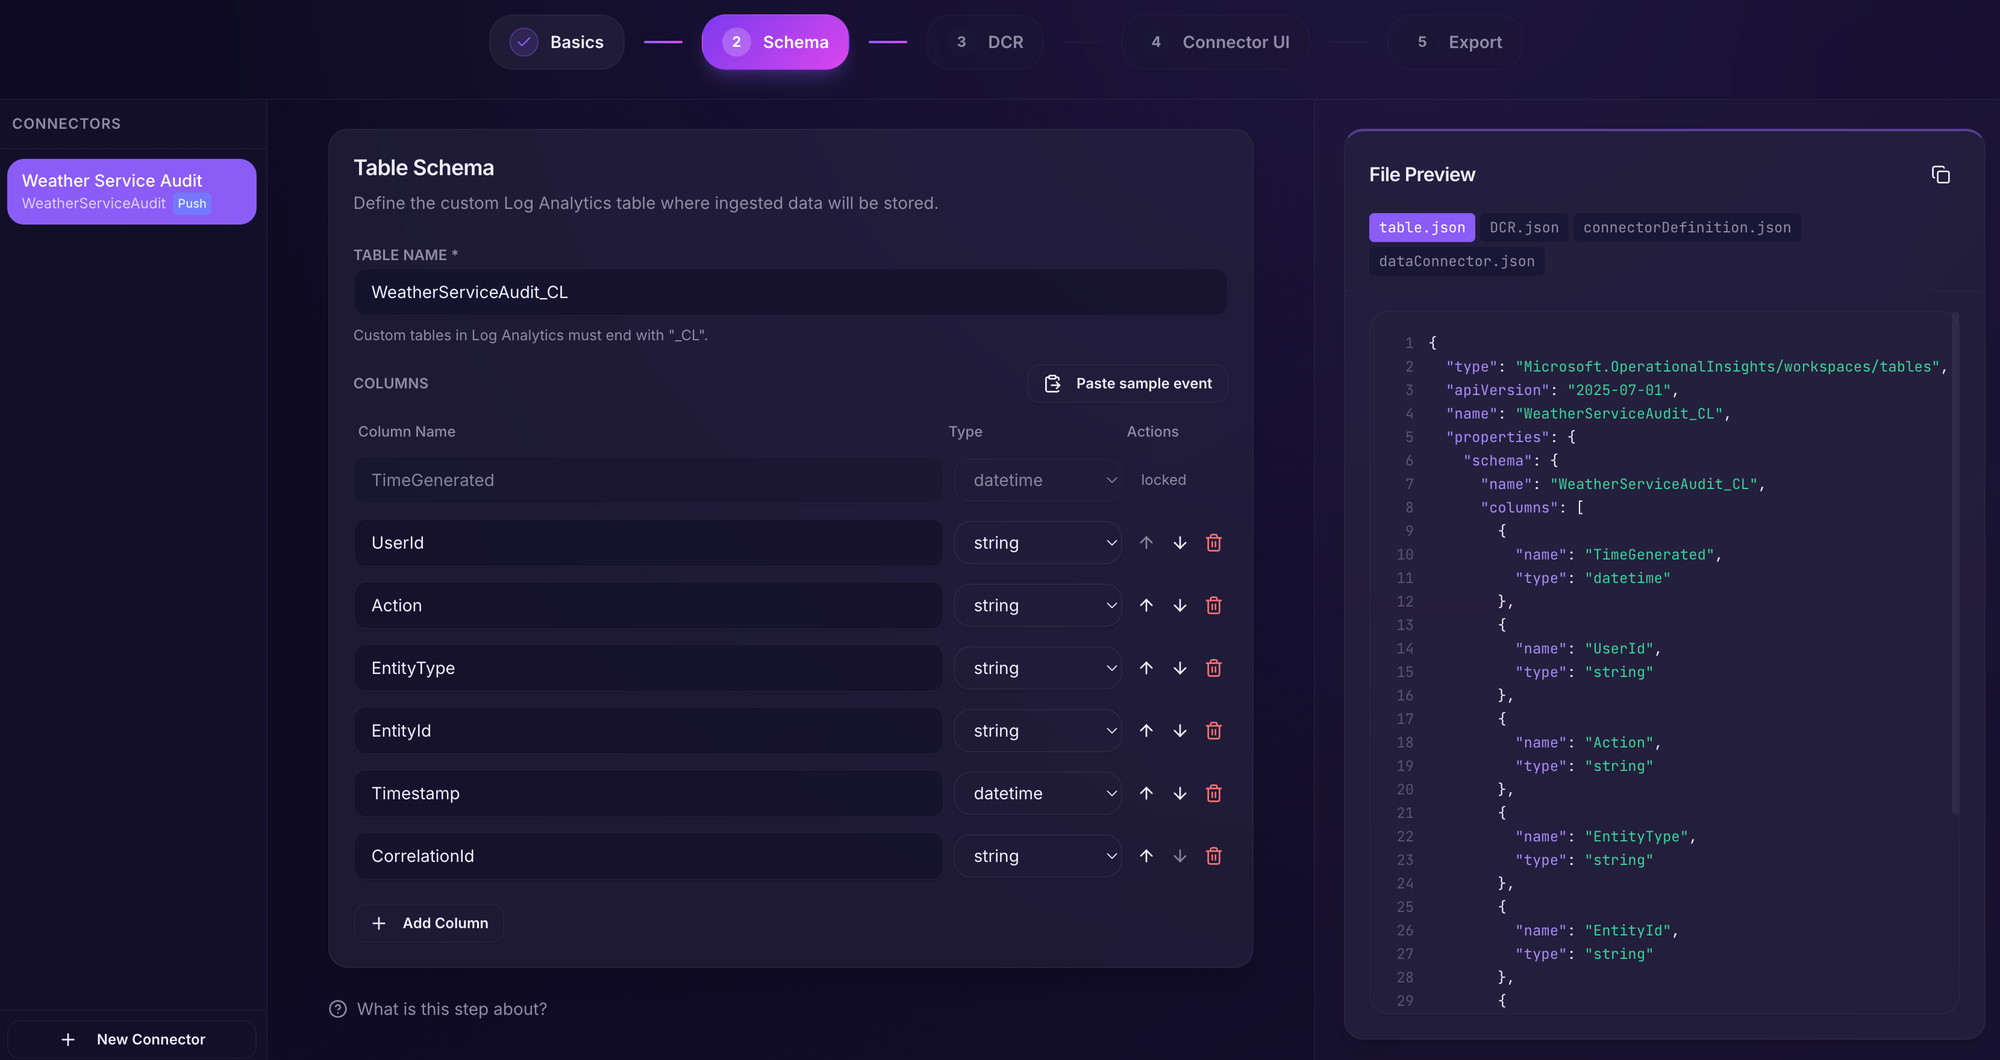
Going to the next section, we have our handy sample JSON that describes how the audit entry looks so we can just click "Paste sample event" or we can add the fields manually.
We'll now have our schema neatly defined. We can also customize the table name in this section - this is the name of the table that can be queried later in Sentinel.
Custom tables must have the postfix _CL.
In the DCR (Data Collection Rule), we have to provide a stream name that will be used to connect the data stream to the table. The default value is fine.
Additionally, we can provide a transform KQL query. These are queries that are used to transform the incoming data if it does not exactly match the table schema.
If no transform is required, we can just put source there. However, we have our Timestamp field for when the event occurred, but Sentinel requires a TimeGenerated value for all tables.
So, we add a transform where we rename Timestamp to TimeGenerated .
source
| project-rename TimeGenerated=Timestamp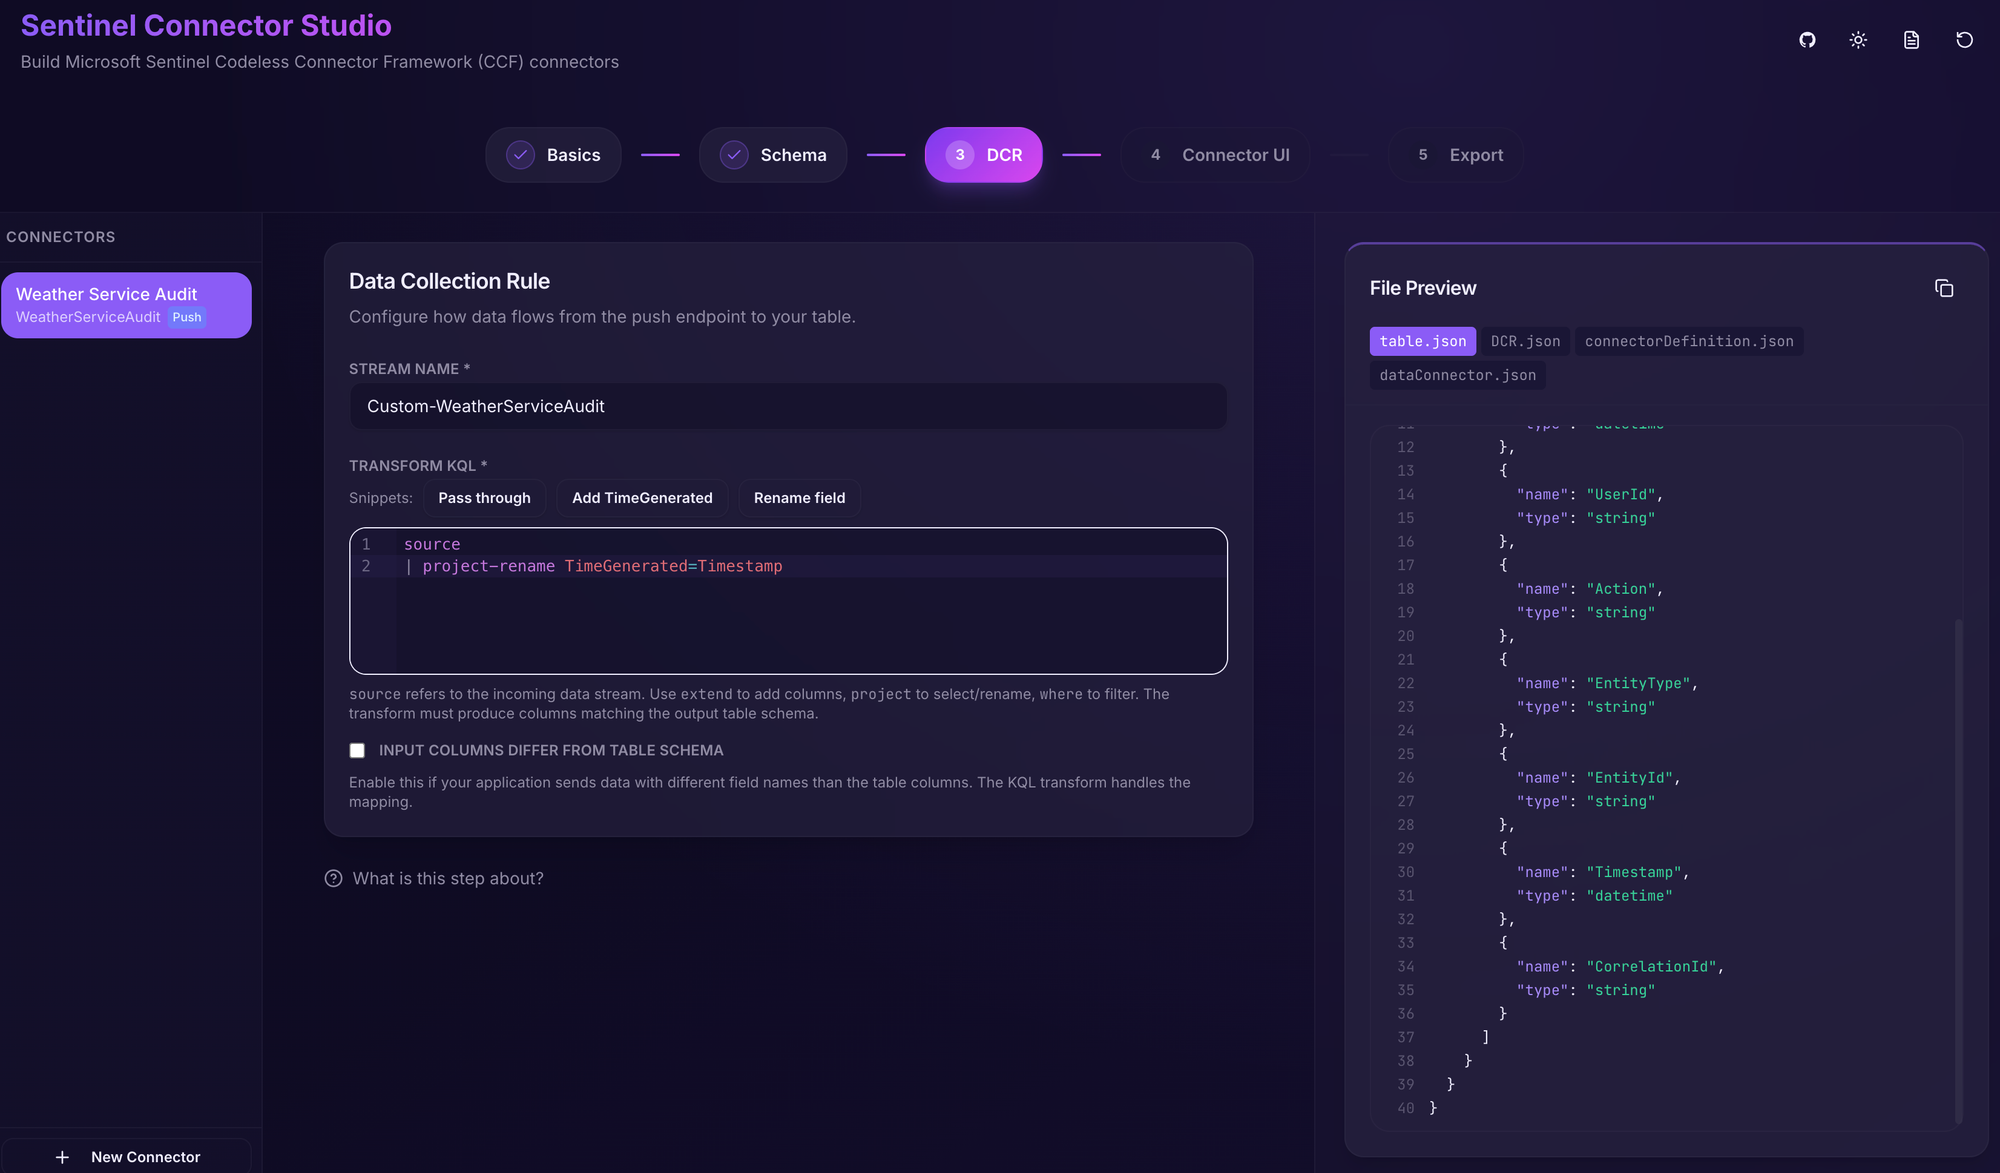
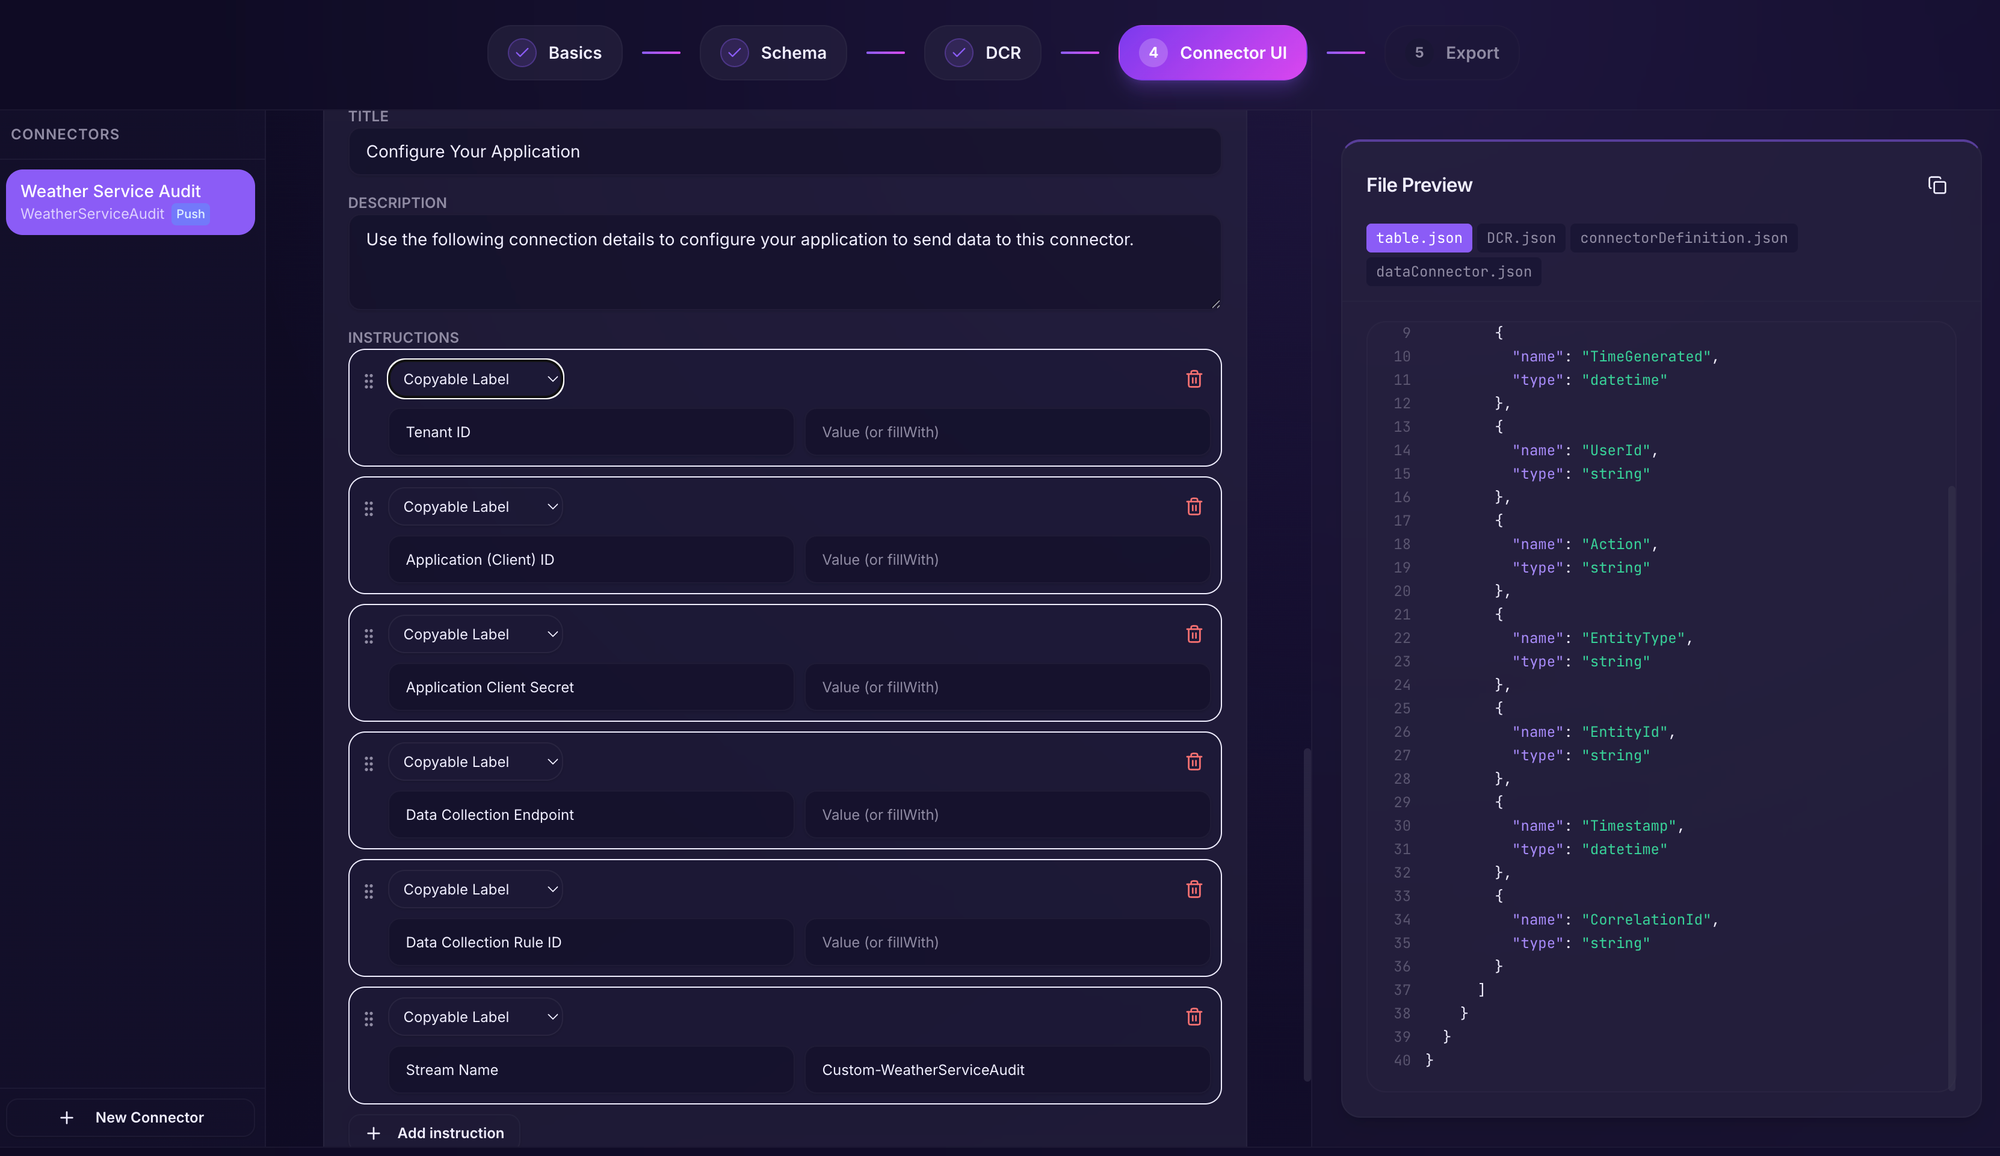
Then we move on to Connector UI which is the section that provides the user a onboarding UI and guidance when enabling the data connector inside Sentinel.
Clicking the "Generate defaults" button will give you a good starting point.

This creates a few queries that Sentinel will use to show the amount of data coming in via the data connector and deployment instructions as well as outputs.
Additionally, it will create a set of required permissions needed to deploy the connector.
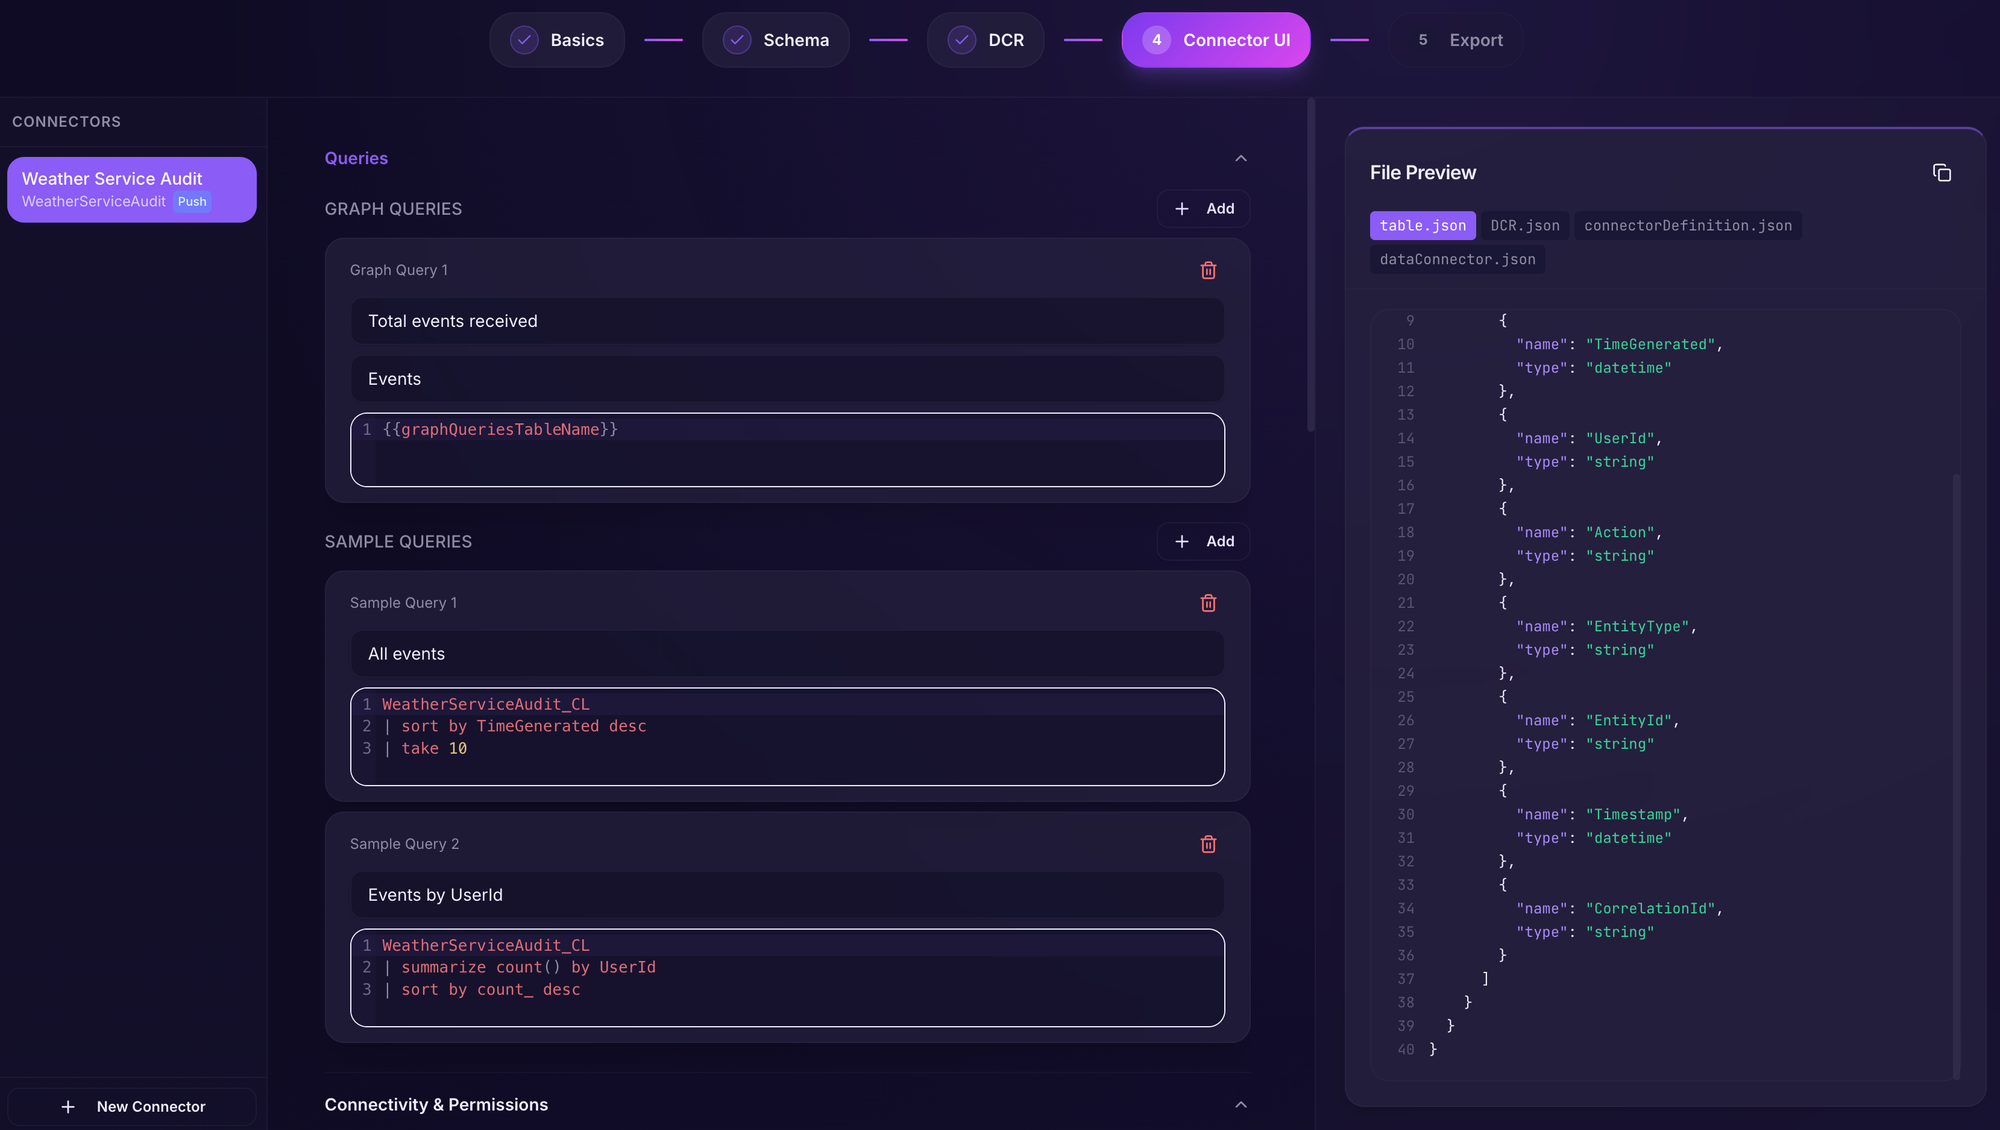
Scrolling down, we can see the outputs defined and these will be auto-populated when the data connector is deployed.
The values here should be recorded - we'll need them to configure our application for pushing data, but we'll get to that later.
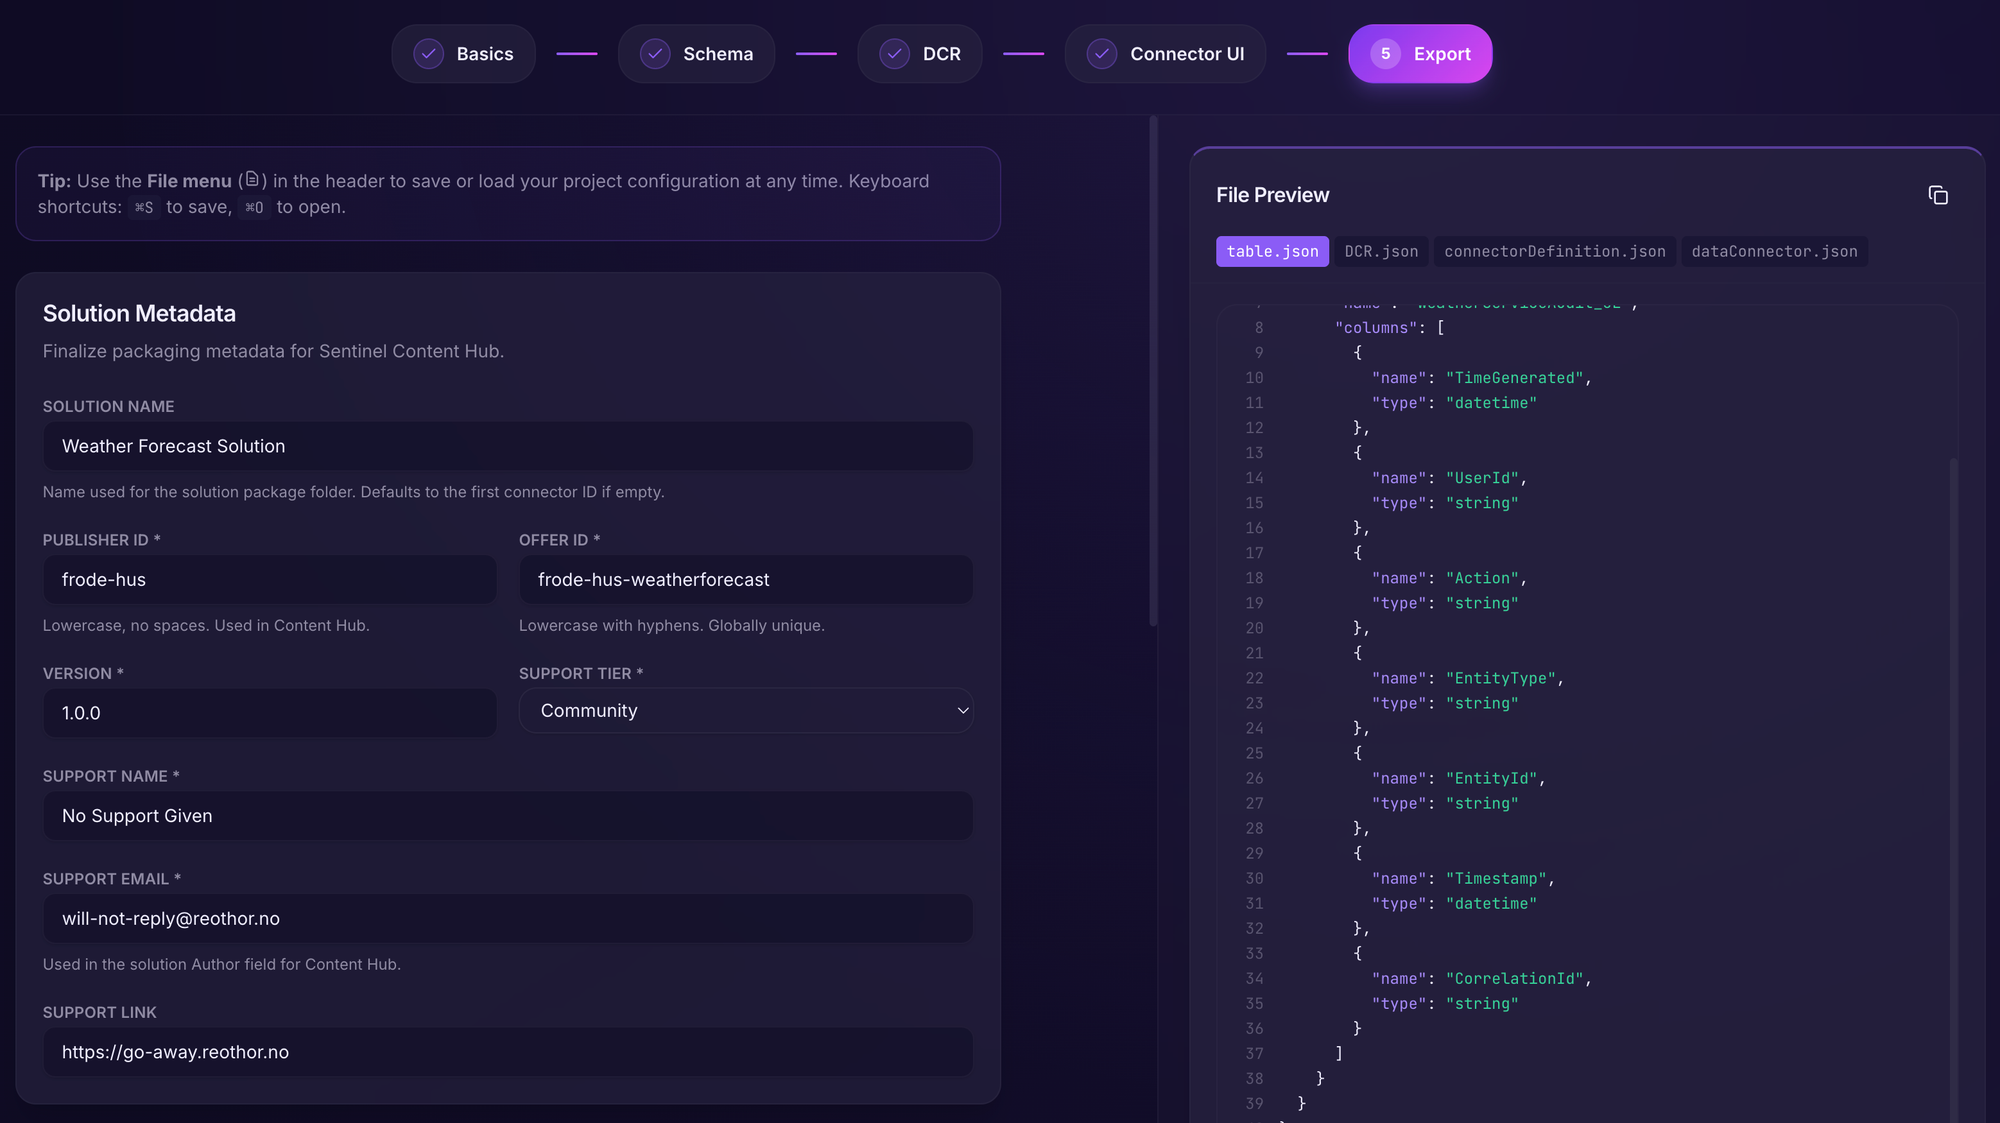
Moving into our final section: Export.
This section is common across all data connectors. Here we will fill in the metadata for our solution such as name, publisher, support information etc.
You have now created your first Sentinel Solution with data connector!
Let's move on to exporting it and get it deployed.
Deploying the solution
The package we have downloaded is actually ready to be contributed to the Azure-Sentinel repository if we want to make it available for everyone easily.
But for in-house applications, we'll probably just want to keep it, well, in-house.
In the Export step, we can now make use of two ways of exporting the template.
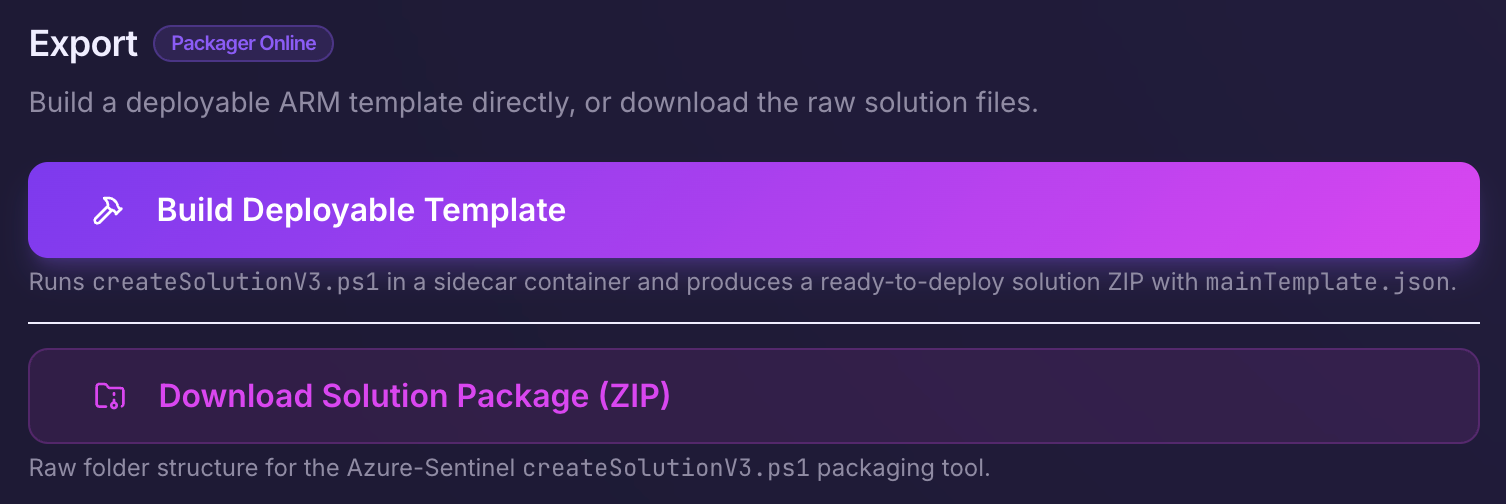
Build Deployable Template
Sentinel Connector Studio offers a way to generate the final template via a separate service that runs the official generation script and returns the final ZIP-file containing all the files - including the final deployable template.
This is the recommended (and quickest) approach.
If the packager service is offline, this button will not be available.
Download Solution Package (ZIP)
This will download the template package which is not deployable in its current form - we will have to generate it using Microsoft's official script.
# Navigate to the packaging tools directory (from Azure-Sentinel repository root)
cd Tools/Create-Azure-Sentinel-Solution/V3

# Run the packaging tool
# When prompted for "Enter solution data folder path:", provide:
# <REPO_ROOT>Solutions/ContosoSecurityAlerts/Data (Note! This path is absolute)
.\createSolutionV3.ps1
The process is documented in the here but will show in Sentinel Connector Studio if this option was chosen.
PS /Users/frode.hus/src/github.com/frodehus/Azure-Sentinel/Tools/Create-Azure-Sentinel-Solution/V3> ./createSolutionV3.ps1

=======Starting Package Creation using V3 tool=========
Version Mode: catalog
Enter solution data folder path : ~/src/github.com/frodehus/Azure-Sentinel/Solutions/Weather Forecast Solution/Data

<omitted for brevity>

************Validating if Package Json files are valid or not***************
File /Users/frode.hus/src/github.com/frodehus/Azure-Sentinel/Solutions/Weather Forecast Solution/Package/createUiDefinition.json is a valid Json file!
File /Users/frode.hus/src/github.com/frodehus/Azure-Sentinel/Solutions/Weather Forecast Solution/Package/mainTemplate.json is a valid Json file!
File /Users/frode.hus/src/github.com/frodehus/Azure-Sentinel/Solutions/Weather Forecast Solution/Package/testParameters.json is a valid Json file!
Ready to deploy
Technically, if we are the developers - we are now done! Distribute this template to our SOC or at least make it available somehow.
Switch our hats and put on the SOC Engineering cap.
Since we went for the recommended approach and had Sentinel Connector Studio generate the final template for us, we can now easily deploy the solution using, for example Azure CLI.
First we decompress the downloaded ZIP and the we can create the deployment:
az deployment group create \
  --resource-group Security \
  --template-file Package/mainTemplate.json
  --parameters workspace=ReothorSecurity
Remember that it needs to be deployed in the same resource group as our Sentinel workspace.
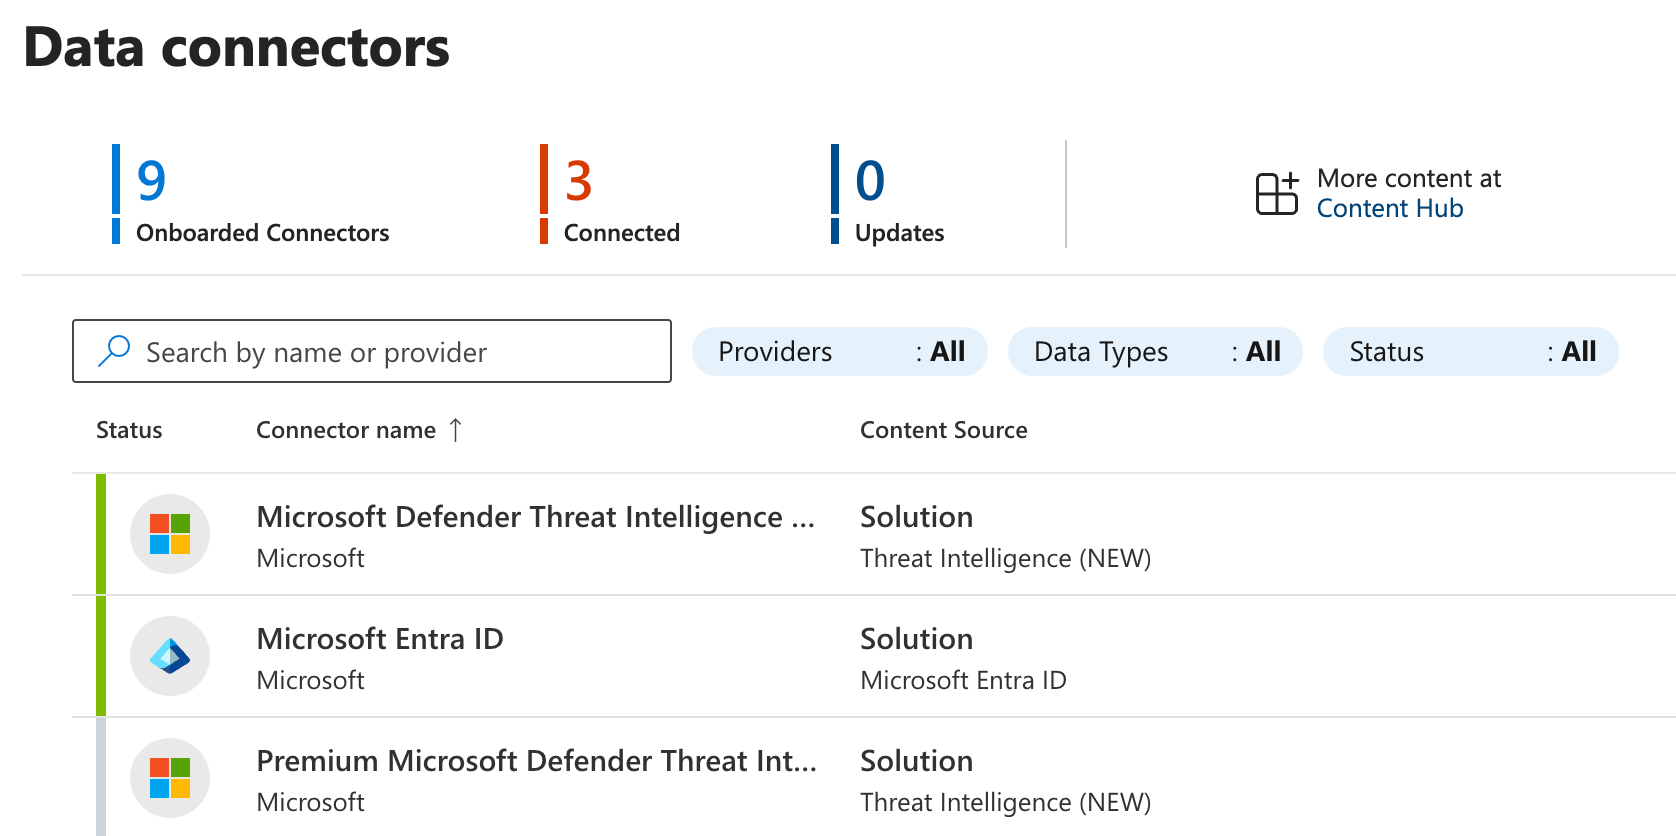
Once the deployment is successful, we can find it in the Data Connector section of Sentinel.
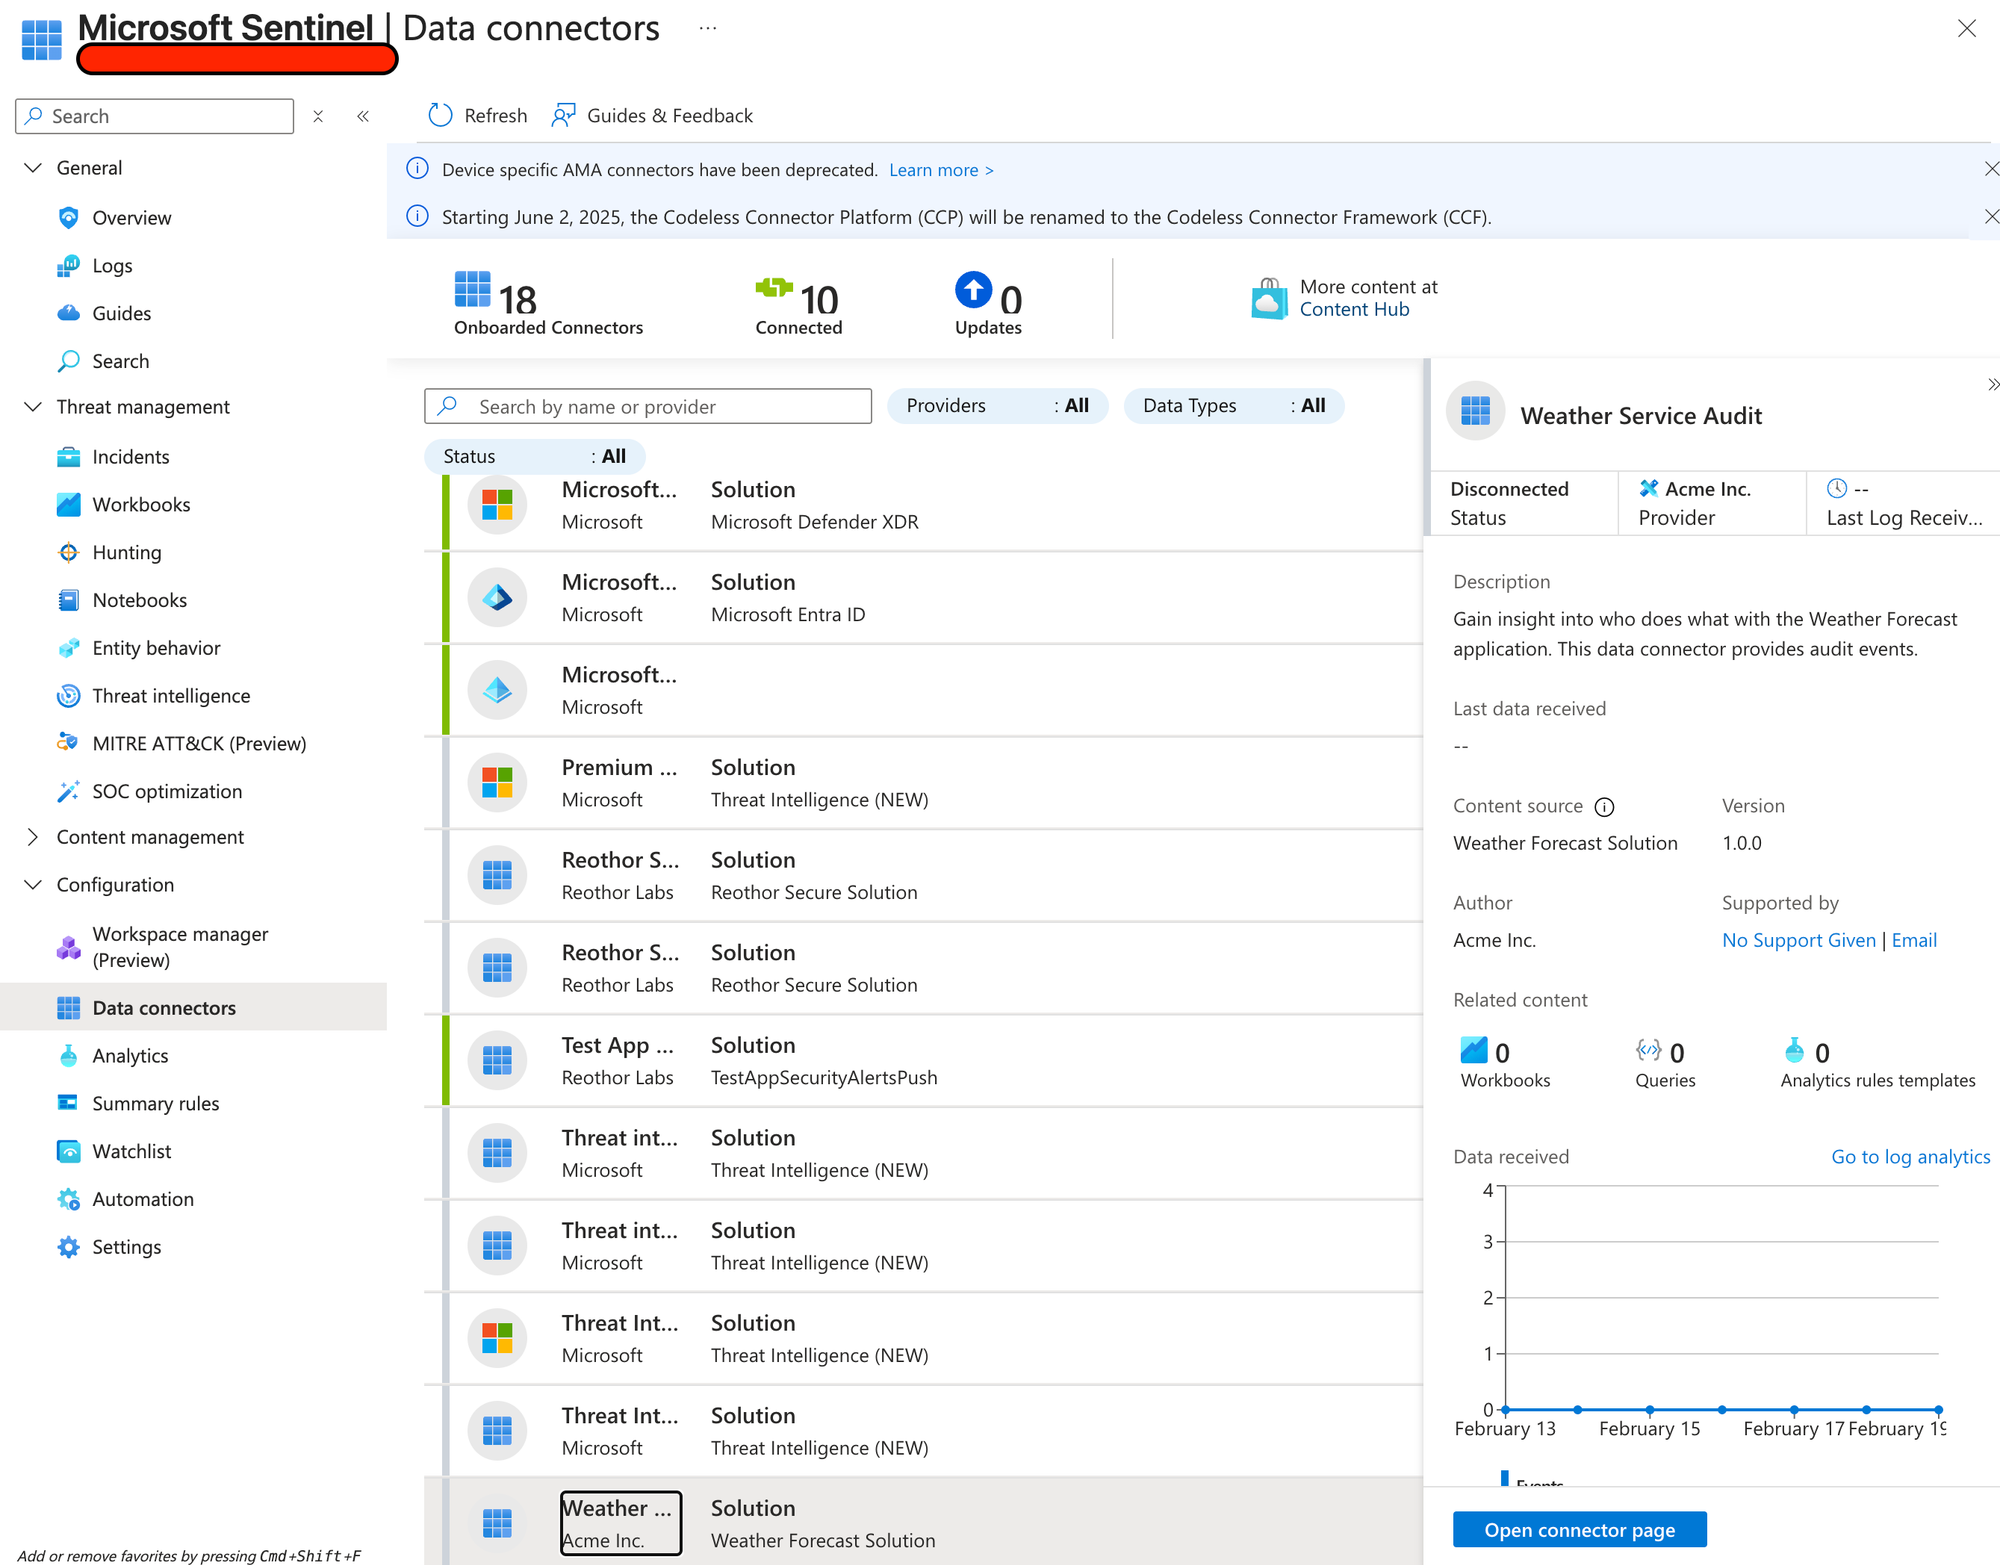
Clicking on "Open connector page" lets us finally enable this data connector:
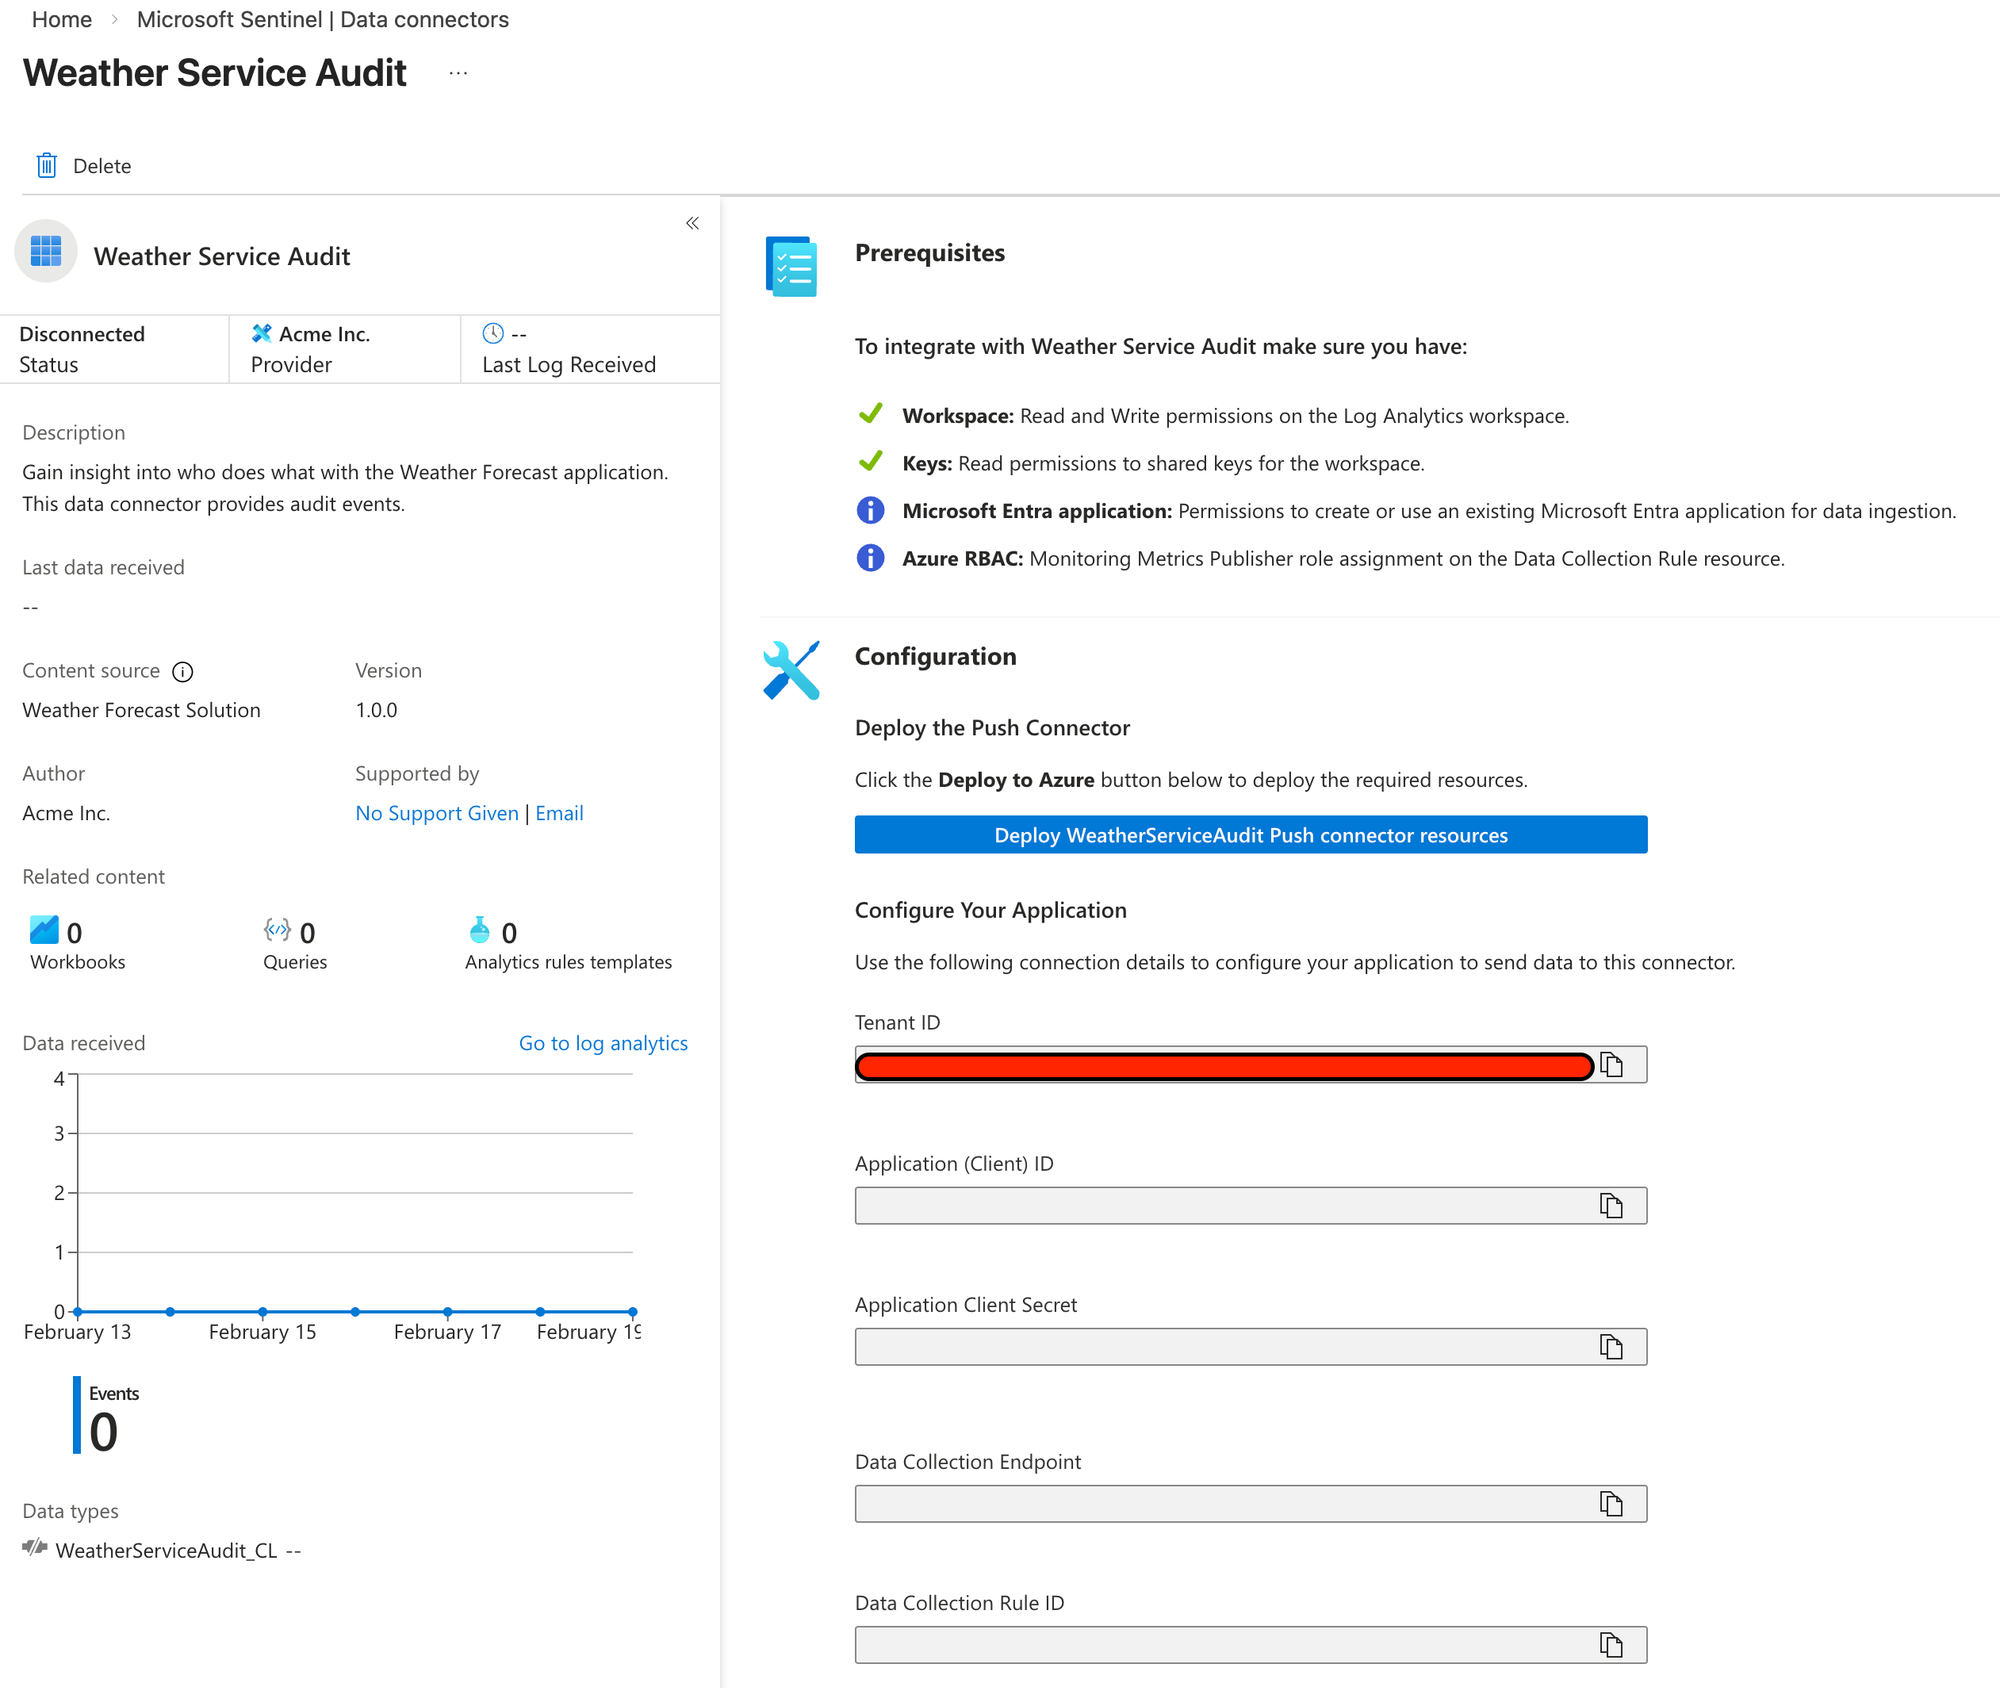
As can be seen in the Prerequisites section, it will check if you have the permissions required according to the Permissions & Connectivity section of Connector UI which we accepted the defaults for.
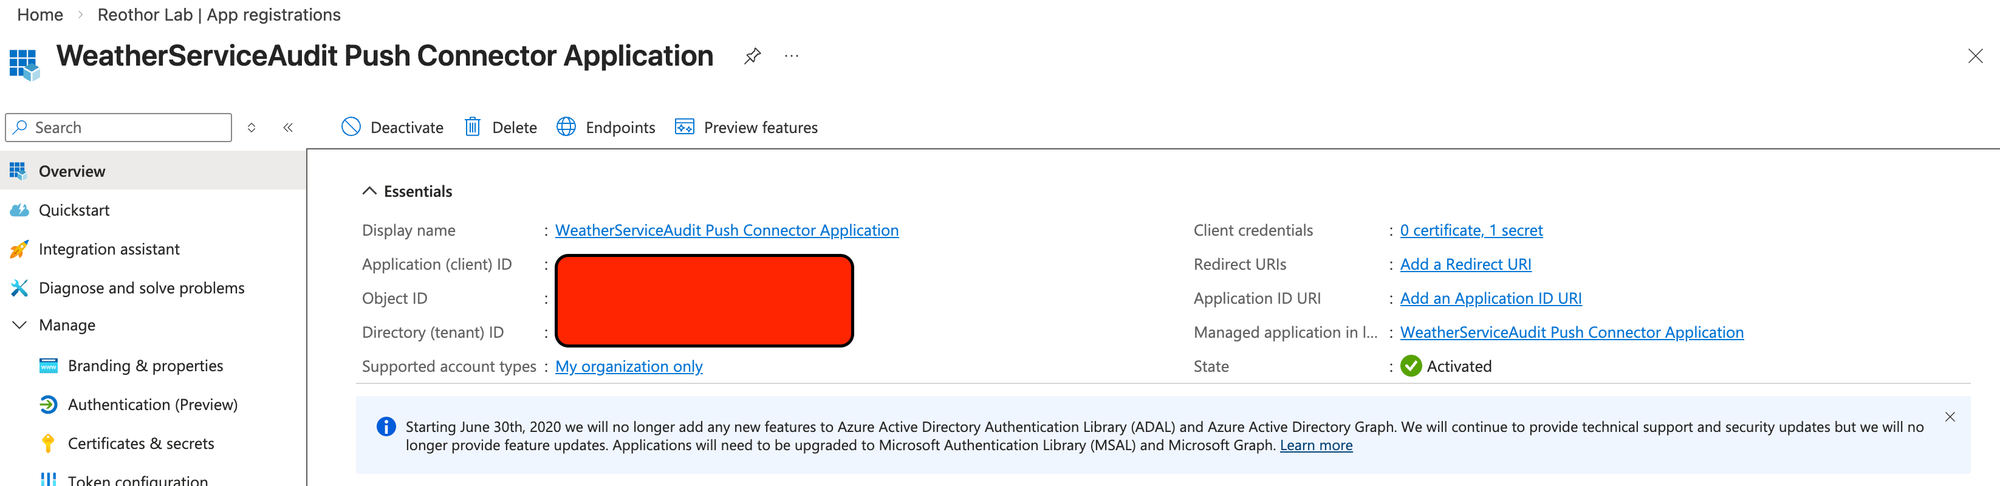
Basically we need Contributor access to the workspace, but because the push connector will create a Entra ID Application we will also need Application Administrator so we are allowed to create and consent to the application.
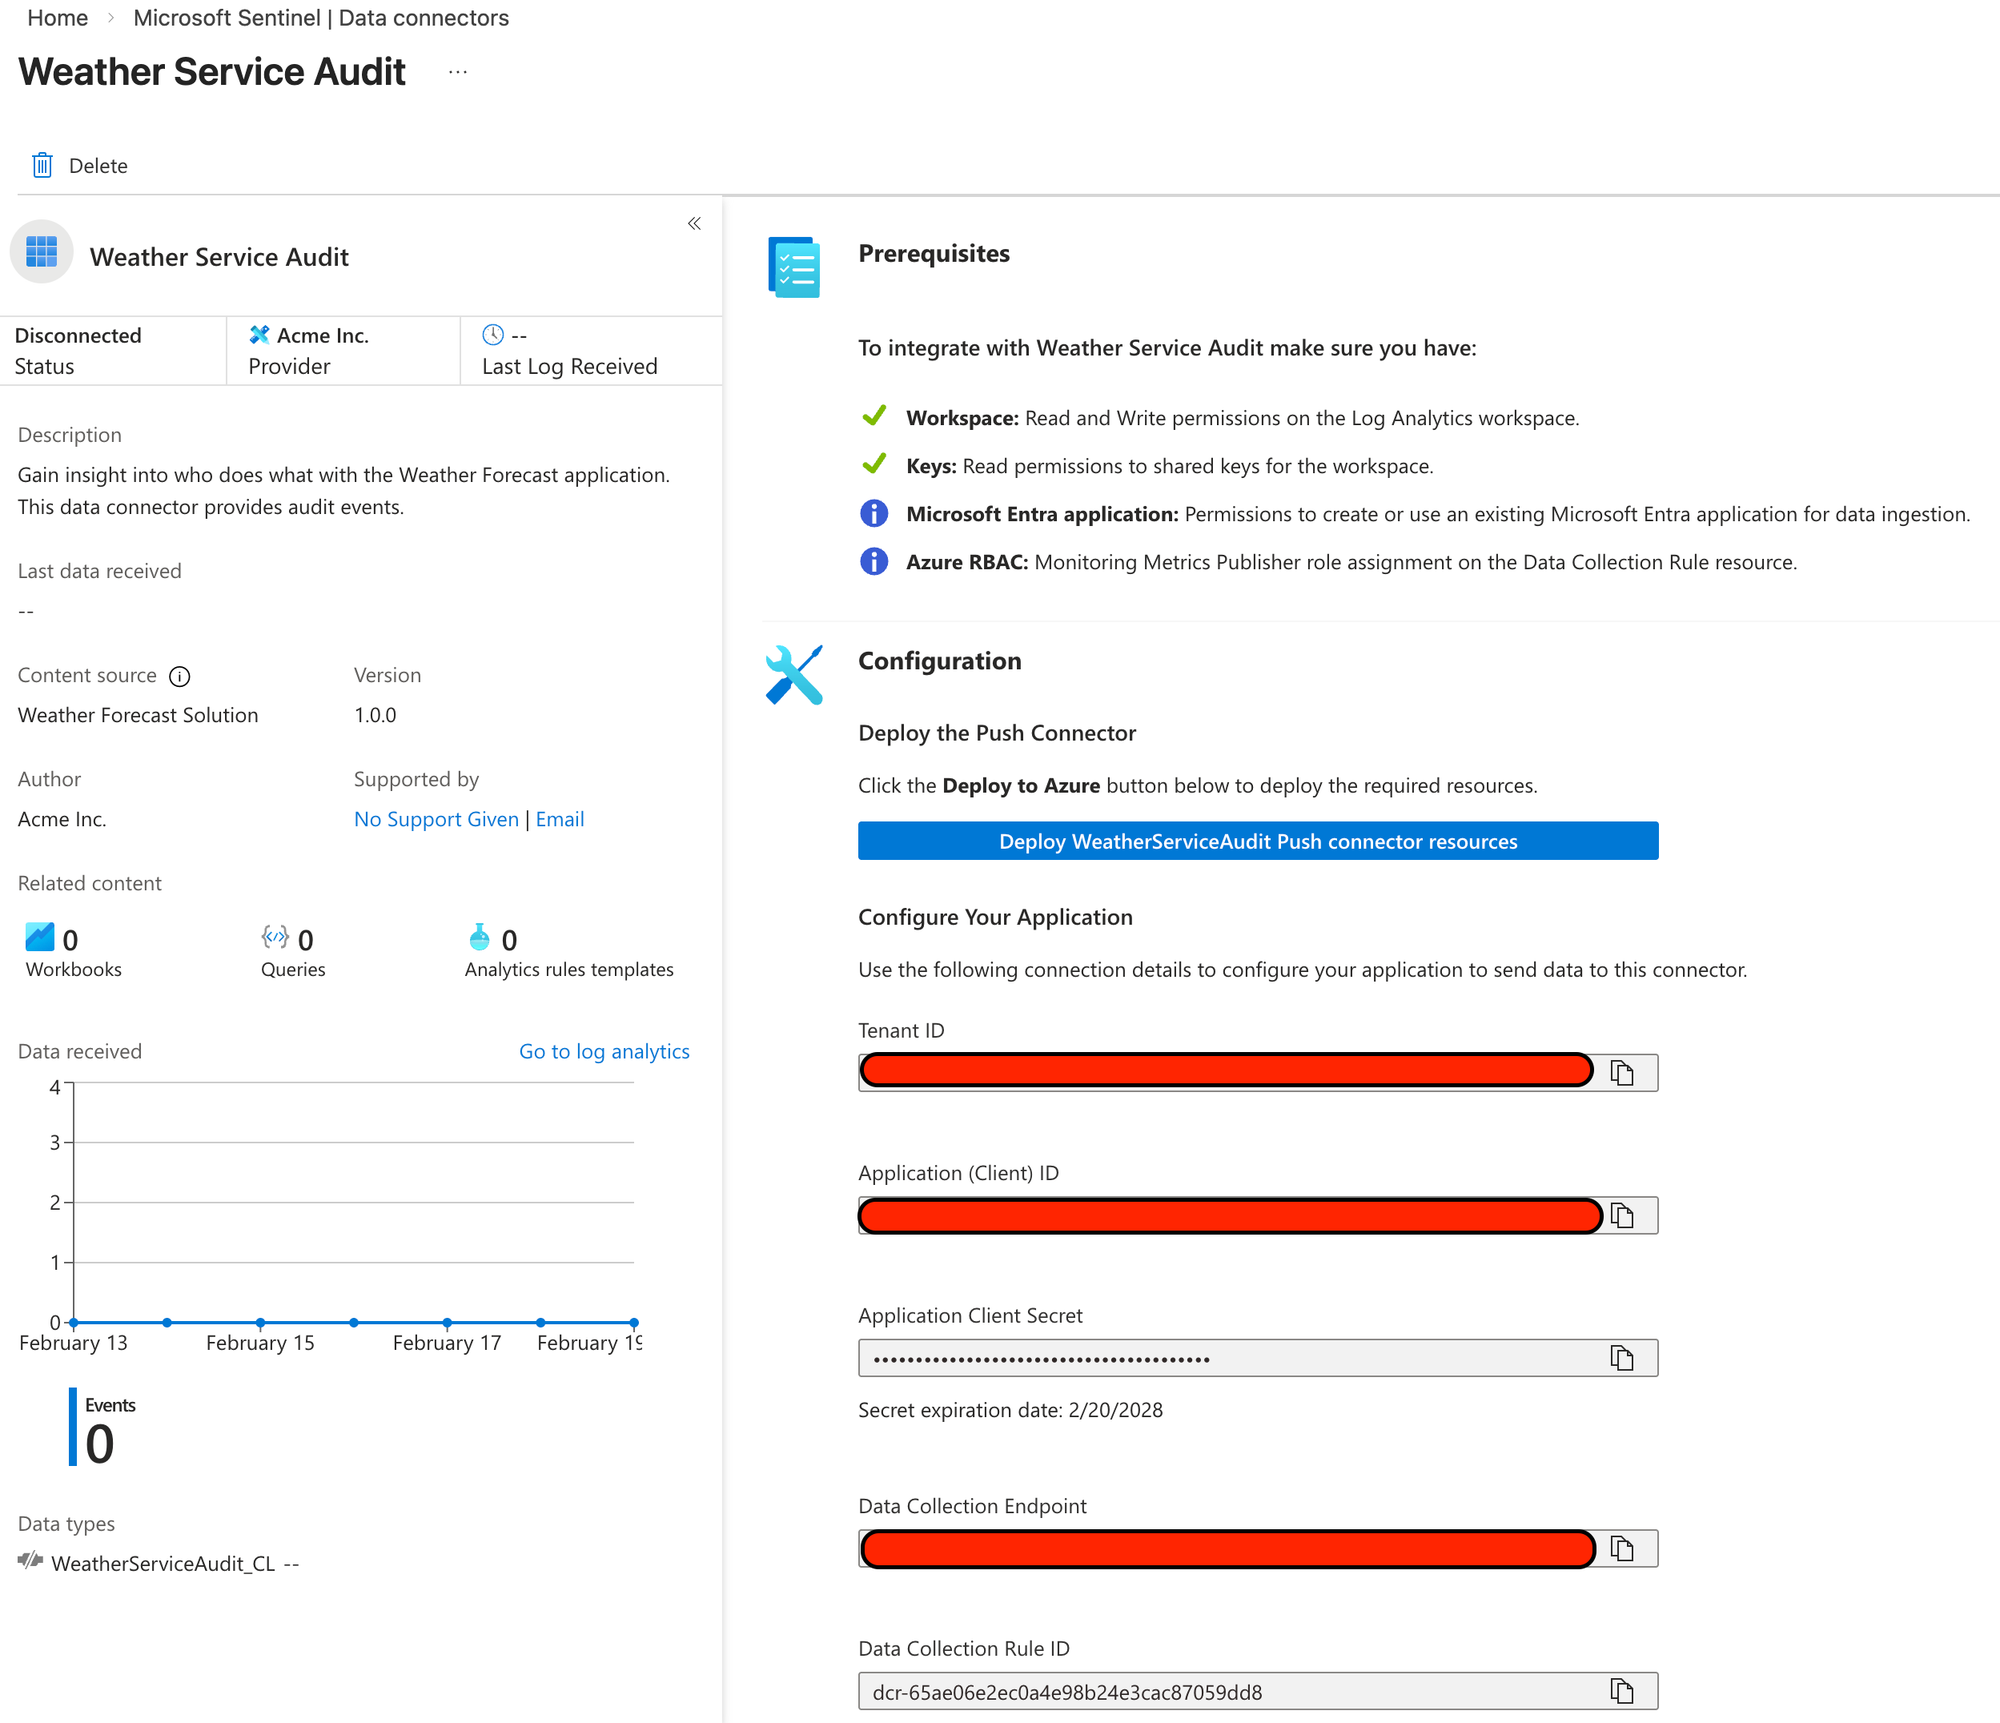
Clicking the Deploy button will enable the data connector and fill in the blank fields below which is what we will need to configure our application.
If we lose the client secret, no worries! The Client ID can be used to find the application in the Entra ID Applications registry and then create a new secret from there.
Take a note of all the now filled in values.
Pushing data from our application
The complete code is available here: Connector Studio Sample
Using the package Azure.Monitor.Ingestion we can easily start pushing data once we've configured our credentials.
First, we need a client:
var credential = new ClientSecretCredential(
            _options.TenantId,
            _options.ClientId,
            _options.ClientSecret
        );

        _client = new LogsIngestionClient(new Uri(_options.DceEndpoint), credential);
Then we can use that to push our entries:
await _client.UploadAsync(_options.DcrImmutableId, _options.StreamName, payload);Seeing the data flow in
Now that we've added the necessary bits to our application, we can call it and see if audit entries arrive in Sentinel.
Keep in mind, the first time your send events it will take 5-10 minutes before everything is available in Sentinel.
Run the application with dotnet run and then call the API with curl http://localhost:<port>/weatherforecast
curl http://localhost:5288/weatherforecast                                                                                                                                                                            [0]
[{"date":"2026-02-21","temperatureC":51,"summary":"Freezing","temperatureF":123},{"date":"2026-02-22","temperatureC":5,"summary":"Hot","temperatureF":40},{"date":"2026-02-23","temperatureC":-14,"summary":"Scorching","temperatureF":7},{"date":"2026-02-24","temperatureC":8,"summary":"Chilly","temperatureF":46},{"date":"2026-02-25","temperatureC":-9,"summary":"Warm","temperatureF":16}]%
We'll then see if our audit entries have arrived in Sentinel.
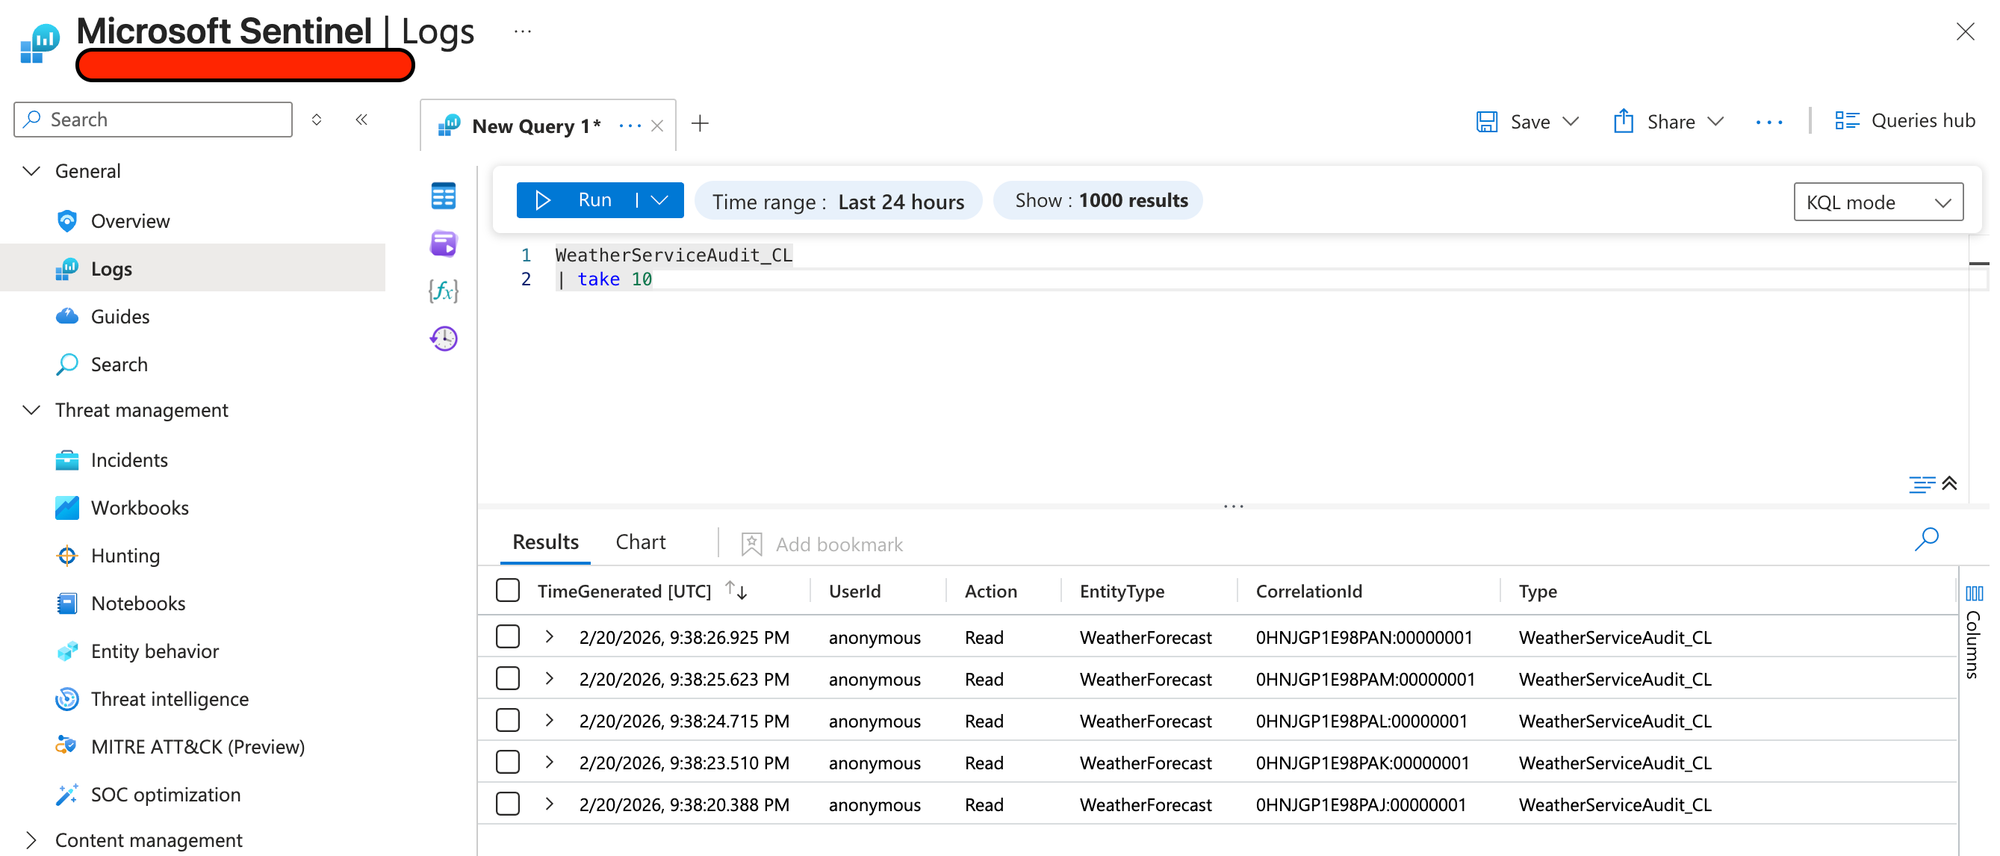
Success!
Summary
It's a bit of a silly example to audit weather forecast accesses, but the concept remains the same:
Always consider your logging to be of value to someone. It could be operations or security, does not matter - be purposeful with your logging.
As the application developer, you know what functions are available and how they work and so you (or your team) are responsible for providing anyone listening outside with the proper information to do their job.
Of course, its not always clear what is needed when it comes to logging so talk to your security team and collaborate on creating insight. You know how it works, they know what they need.
Talk together.