Debugging web requests using mitmproxy, WSL and VSCode


If there is one thing I find absolutely essential when doing any kind of development or troubleshooting is to have a good tool for intercepting web requests and inspect the payloads. It takes out a lot of guess work from the process and you can play around with the requests without having to tweak code.
Of course, there are tons of tools to do this and I've often used Fiddler - Web Debugging Proxy for this and even Burp Suite - Application Security Testing Software (it's not just for pentesters and such!).
My preferred environment these days is running Visual Studio Code from WSL2 using the Visual Studio Code Remote - WSL extension. This basically means VSCode launches a server on linux and runs everything from there rather than Windows.
This also means that running Fiddler, for example, will not intercept the requests made by processes running on linux as it runs in a lightweight VM.
Now mitmproxycomes in handy - fire it up in my trusty Windows Terminal and I can inspect all web requests easily! How? Read on :)
Installing mitmproxy
This can be done as easily as pip3 install mitmproxy and you're off!
When you run mitmproxyfor the first time, it will generate some self-signed certificates for you in ~/.mitmproxy in order to inspect HTTPS traffic.
Now, some applications will happily allow you to just give you a warning when untrusted certificates are used, but many will deny the request and rightly so.
This means you will have to add the mitmproxy to your trusted certificate store. Here I show how to do it on Ubuntu, but other distros might have different procedures.
Trusting the mitmproxy certificate
First, create a folder under /usr/share/ca-certificates/ to hold your custom certificates for easy cleanup.
sudo mkdir /usr/share/ca-certificates/self-signed
Then copy over the certificate (it needs to have a suffix of .crt)
sudo cp ~/.mitmproxy/mitmproxy-ca-cert.pem /usr/share/ca-certificates/self-signed/mitmproxy-ca-cert.crt
Next you you will have to import it using sudo dpkg-reconfigure ca-certificates
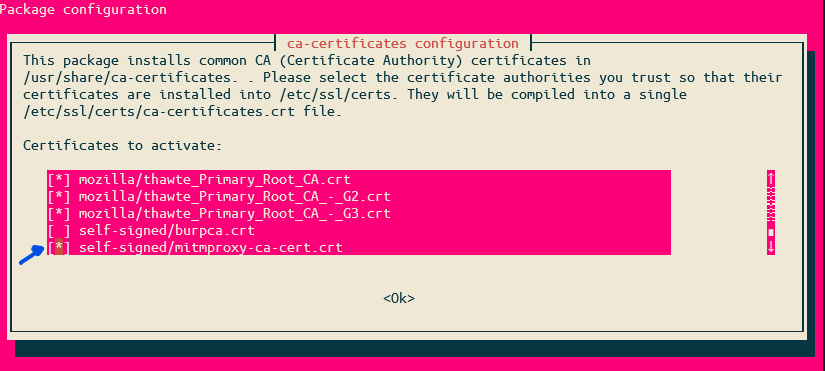
Check the certificate and select Ok to import.
To remove it again, just delete the file and run sudo dpkg-reconfigure ca-certificates again.
Intercepting requests when using VSCode
In order to intercept the web requests, you have to tell the application(s) which proxy to use. All of them have their own way of doing this, but usually they all respect the HTTPS_PROXY environment variable if set.
In the session you run VSCode from, simply set the environment variable like so:
export HTTPS_PROXY="http://127.0.0.1:8080"
Now when you run any commands from that session mitmproxy will pick up any HTTPS web requests.
And it turns out that VSCode respects HTTPS_PROXY in the sense that when you run code . from the session you've set the variable in, it will automatically pick it up.
You can also run it using HTTPS_PROXY="http://127.0.0.1:8080 code . if you just want VSCode to use the proxy, but not the session in general.
And since all debugging processes and such now run in the same session thanks to the WSL Remote extension, you will see all web requests show up in mitmproxy.
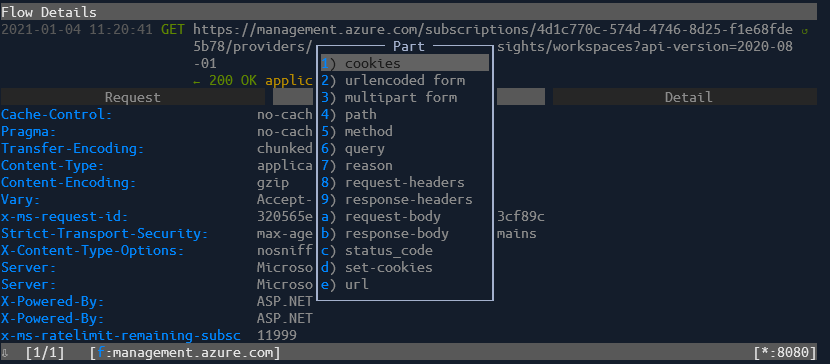
This also includes any calls VSCode itself performs so you will get some noise - such as in this screenshot where you also get the Azure Active Directory OAuth2 login requests:

You can easily filter this out by pressing f in mitmproxy and type in the domain name that you are interested in.
Inspecting requests
mitmproxyhas a lot of features and I won't get into them here, but you'll probably use two things alot: Inspecting the request/response and modify/replay the request.
To inspect the request you simply select the one you are interested in from the list and hit enter.
From this detail view, you can hit e to edit the request and then r to replay it.
You might even want to intercept the request before its being sent off to modify in-flight; here's a nice tutorial for doing that: Intercept Requests (mitmproxy.org)
And that's all there is to it!