Setting up Azure AD Application for authentication
An Azure AD Application is basically just a entry in Azure AD saying: "I am application A, I offer certain roles and permissions that can be assigned to users and I would like Azure AD to handle the authentication".


I know how to retrieve tokens and all that, but what is this Azure AD Application you keep talking about? How do I set it up?
I keep hearing this question so since the Azure portal now has a new improved experience for dealing with this, I thought I could do a (hopefully) easy and simplified writeup on the subject.
What is an Azure Active Directory Application?
An Azure AD Application is basically just a entry in Azure AD saying:
"I am application A, I offer certain roles and permissions that can be assigned to users and I would like Azure AD to handle the authentication".
Azure AD will then respond to authentication requests for that application and use its manifest and user assignments to generate access tokens.
Two types of Azure AD Applications
In a nutshell, there are two types of registrations that can be done. They only differ in whether or not a redirect URI is being actively used and the application's usage.
Web: Use this for applications that are running outside of the users' reach. These are considered more secure as they are safely (hopefully) tucked away on a server somewhere. These applications can have their own identity and log on as themselves to issue tokens on behalf of their users. This can be Web APIs, services, etc.
Public client: Applications that are considered untrustworthy and unable to keep a secret - such as mobile clients, javascript and command line tools distributed to users. Basically anything that anyone can have a peek into and pull secrets out of.
Redirect URIs: These things are used to tell Azure AD where to send the access token once authenticated. They also make sure Azure AD doesn't redirect the token somewhere you haven't approved. Even supports localhost for local development! Also, a common cause of error where the redirect URI your application expects isn't registered in Azure AD and you will get an error saying "redirect URI does not match any registered URI".
Whether or not they are actively used depends on your authentication flow - more on that here.
Our mission
In an attempt to keep this short and useful, I won't go through everything about this topic in depth - there are plenty of awesome and thorough documentation on this out there.
So, what will we cover? We will make one of each type of application:
- Server application - our main part where all our secured stuff lives. This will be a web application.
- Client application - the little runt wanting access to the goodies. This will be a public client.
Registering the server application
There are two ways of registering an application - via the portal or Azure CLI.
Let's do it the clicky way! Azure CLI is its own thing - same approach, just command line. We can do that in another post.
Go ahead and log onto the Azure portal.

We will be using the new preview blade for App registrations as that simplifies things a lot (but also confuses things a bit) - fun!
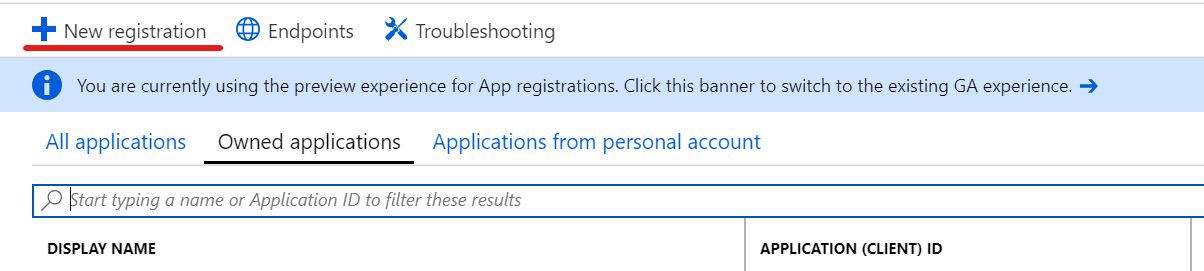
Click New registration and give the application a name and a reply url (or redirect URI) if your application expects it (such as a Web API).
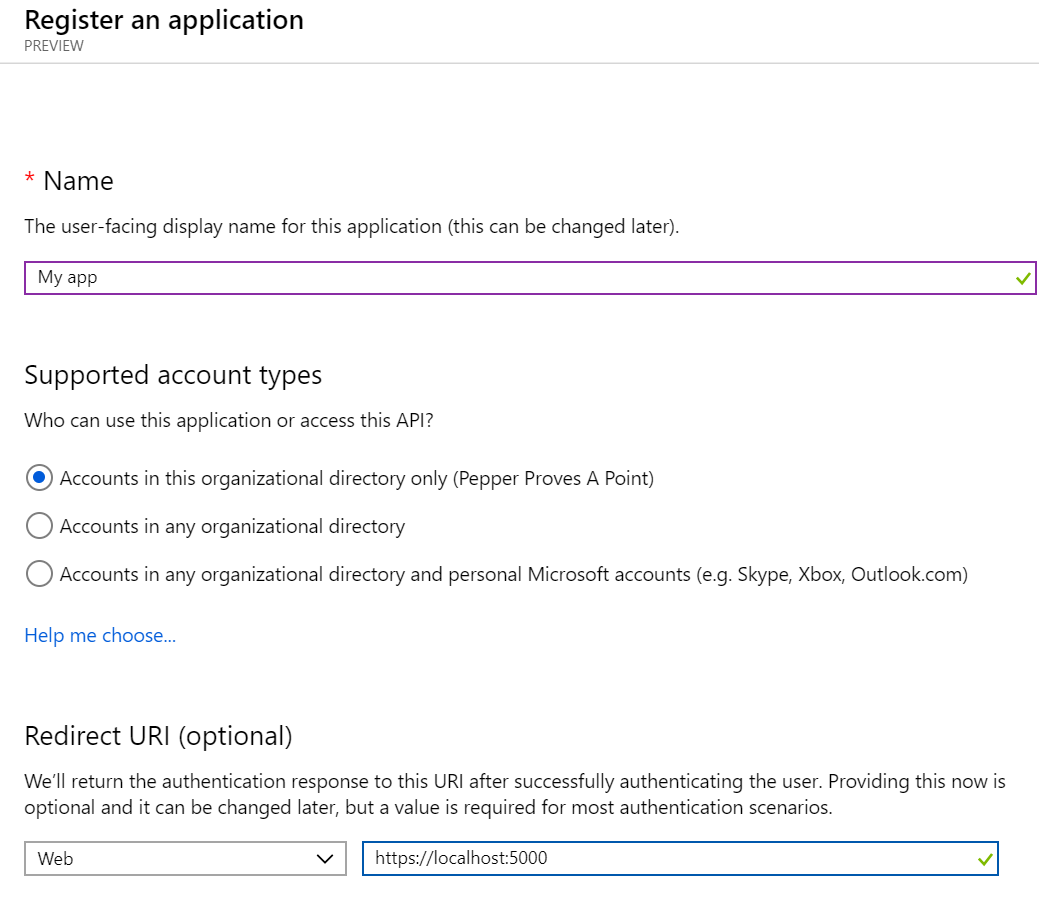
When it comes to Supported account types the default value is most likely your cup of tea unless you are making a multi tenant application.
Click Register and ta-da, presto!

There are two things here you need to take note of:
- Application (or client) ID
- Tenant ID
Previously, the Application ID has been referred to as either client ID or resource ID - depending on the role it has in the flow. Very confusing at times and the culprit of many bewildered looks on developers' faces.
When the access token is issued, the audience of the token will be the Application ID. There will only be one ID here even though the OAuth 2.0 spec says it can be an array. Azure AD only supports one token per resource/application - kind of nice in case the token ends up in clammy hands; at least "only" one application will be breached.
The tenant ID will be part of the authority endpoint and appear in the token as issuer.
https://login.microsoftonline.com/<tenantID>
If you are creating a multi tenant application, the authority endpoint will be https://login.microsoftonline.com/common as it is not bound to a specific tenant.
This next part is a bit of the confusing part if you have used the old way of registering an application. Before any other application can be given access to this application (which needs to be done before you can ask to be issued a token for it) - you need to expose and API and provide a scope for other applications to ask for.
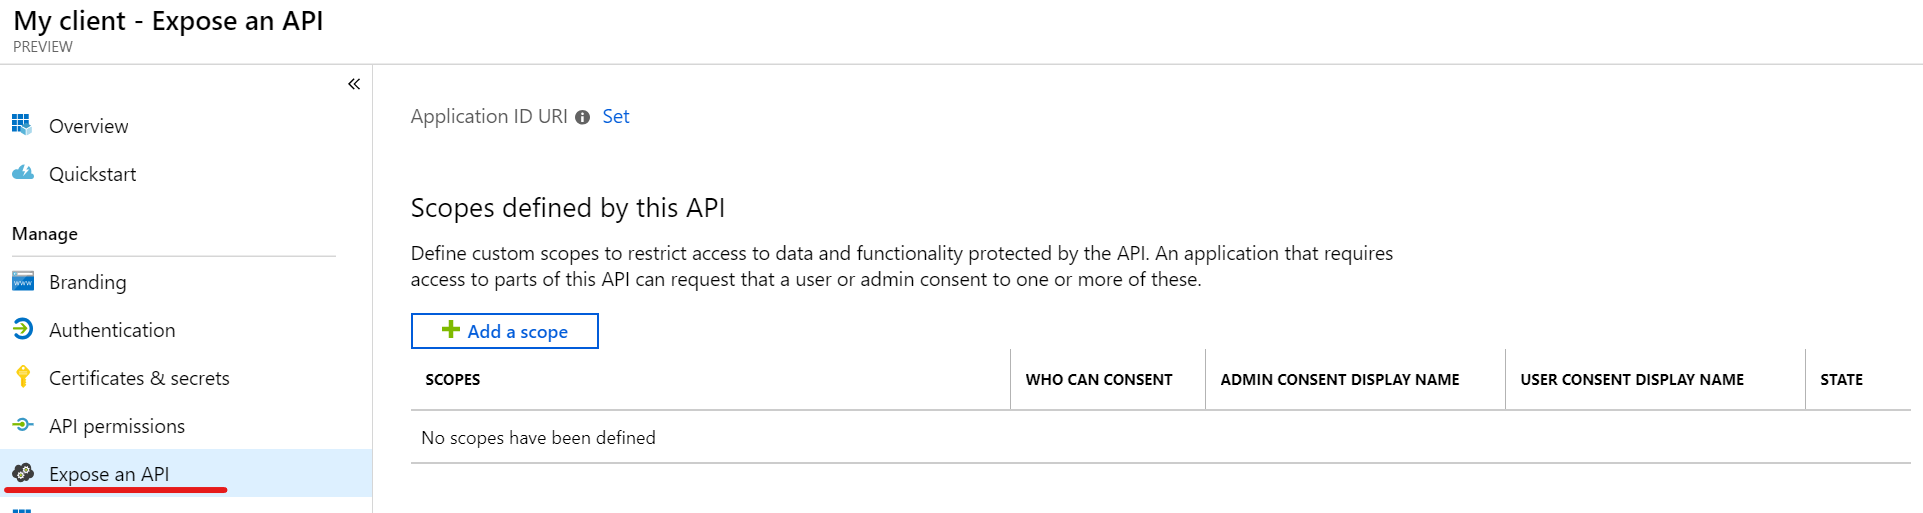
Click Expose an API.
Previously, this was done by editing the application manifest (json file with carefully hidden documentation), but at least there was a default scope already defined for you so you could start using it straight away.
So, click Add a scope and register an Application URI the scope can be bound to - usually the default is fine, but you can change it. This is only done for the first scope - all other scopes (you can have as many as you would like) will be bound to this.

Save and continue.
Next, we create the actual scope. Here we define the internal name - it can be anything as long as it is unique for your application. The recommendation is something like resource.operation.contraint.
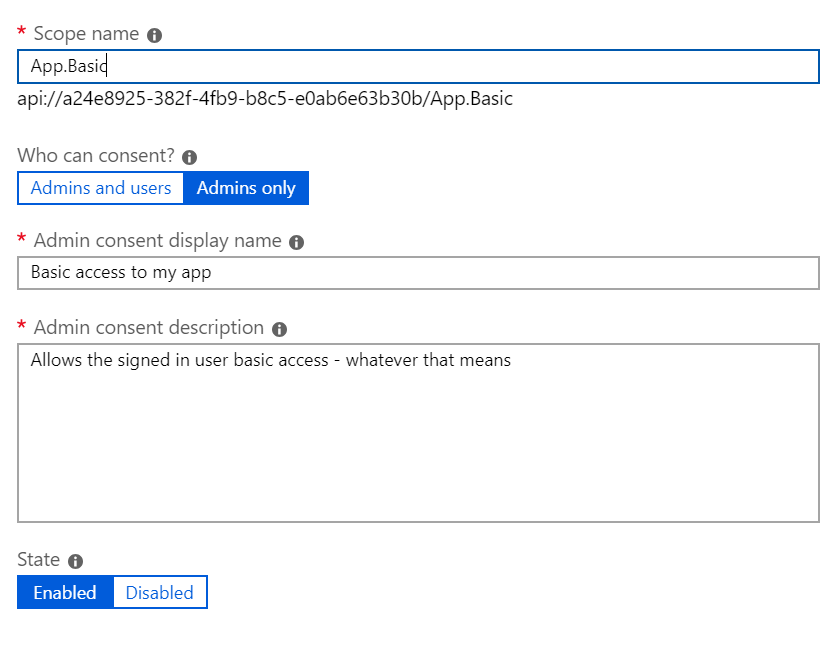
Who can consent?
Also a topic of confusion. Previously, Azure AD was kind of unclear who could consent to what. These days its a lot better.
If set to Admins only then, well, only admins can consent to users being allowed to log in and share their information with this particular application. Furthermore, if an admin does consent then the consent applies to all users in the organization.
If set to Admins and users it means that each user can consent on their own behalf. It also means that unless an admin has consented, each user will be presented with a consent form on their first login to the application - can be very annoying.
Admin consent display name and Admin consent description: As the name suggests it provides a more description text to the user or admin when asked to consent to this particular scope within the application.
There are many fun things you can do with an application, but we are keeping it simple and move on to the client!
Registering the client application
This is almost the exact approach as the one above, so I won't replicate it here. Instead, I will focus on where it differs.
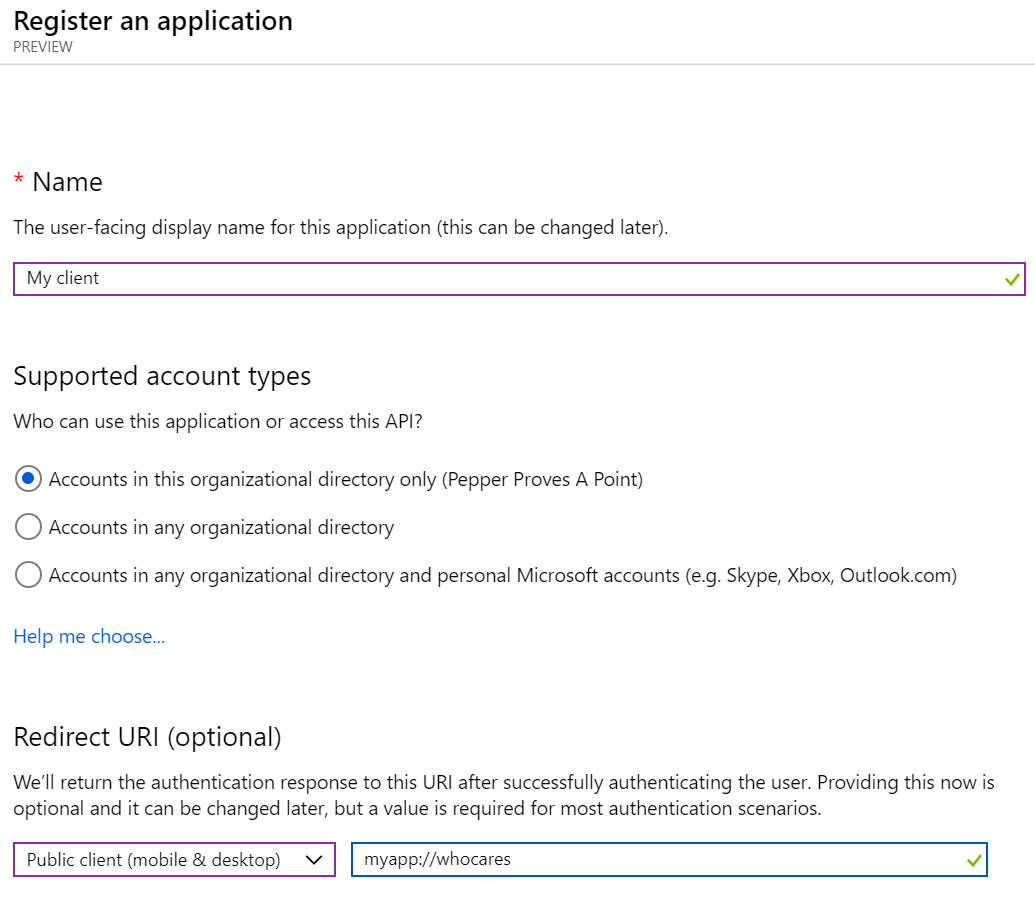
As you can see: Instead of setting Redirect URI to web we set it to Public client where the redirect URI is not important. Well, not in this case - for mobile applications and certain others, there is a specific URI that needs to be used here that identifies your app on your device.
We also need to explicitly set this application as public.
If you click Authentication and look at the bottom of the page, you should see this:
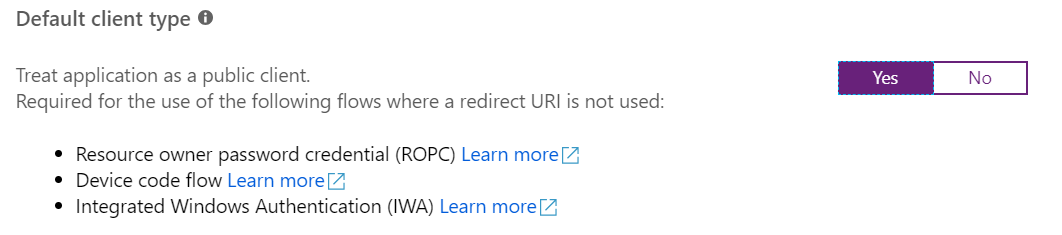
Set it to Yes and click Save.
Now we need to give our client application permission to access our other application.
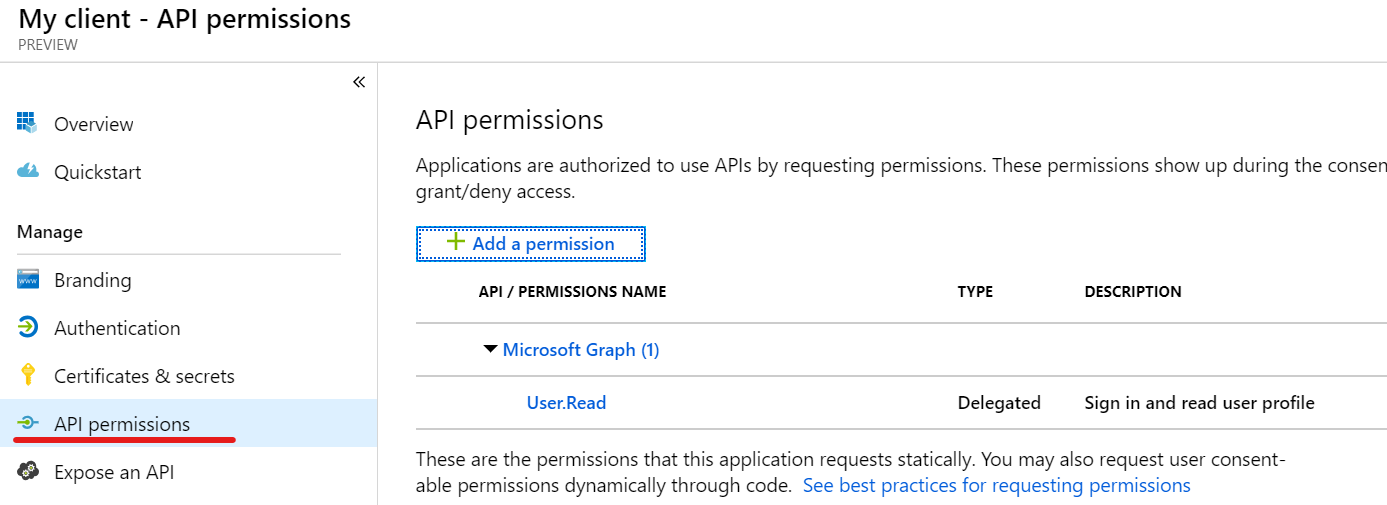
It already has a permission defined - the permission to actually sign the user in and read their profile.
Let's add another - click Add a permission
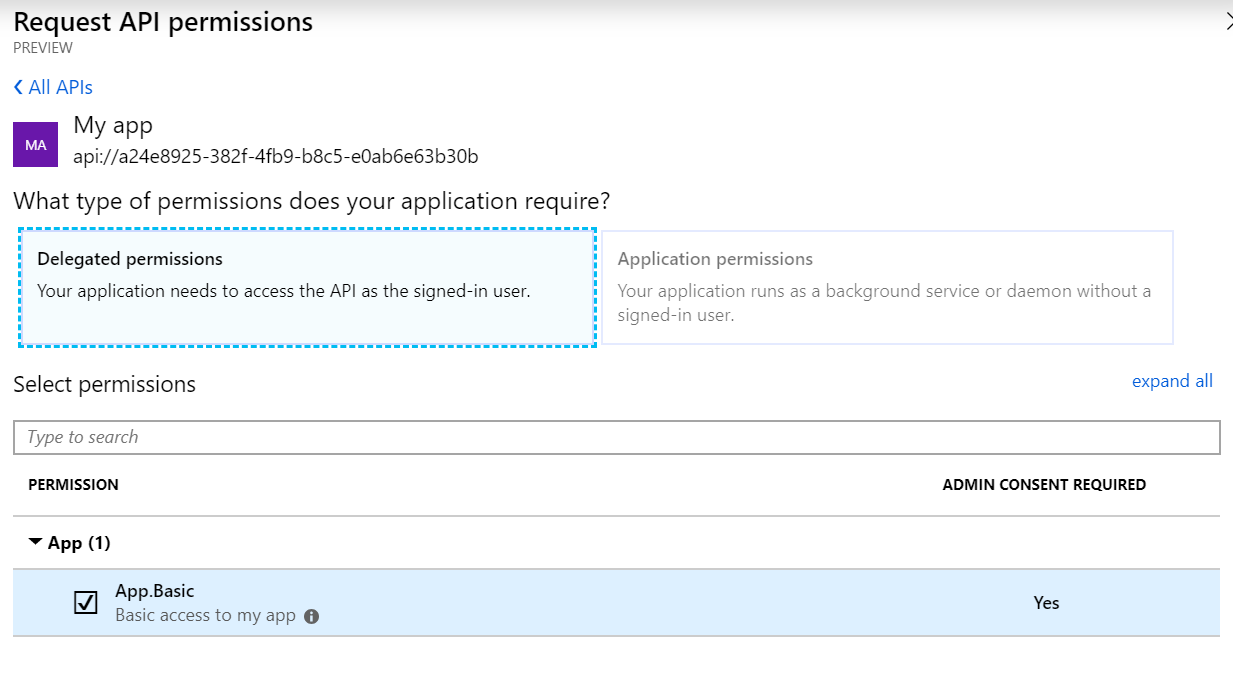
A blade pops in with various choices - you can give permission to access various Microsoft APIs or My APIs.
If your application isn't listed here then you skipped the part about adding a scope further up in this post.
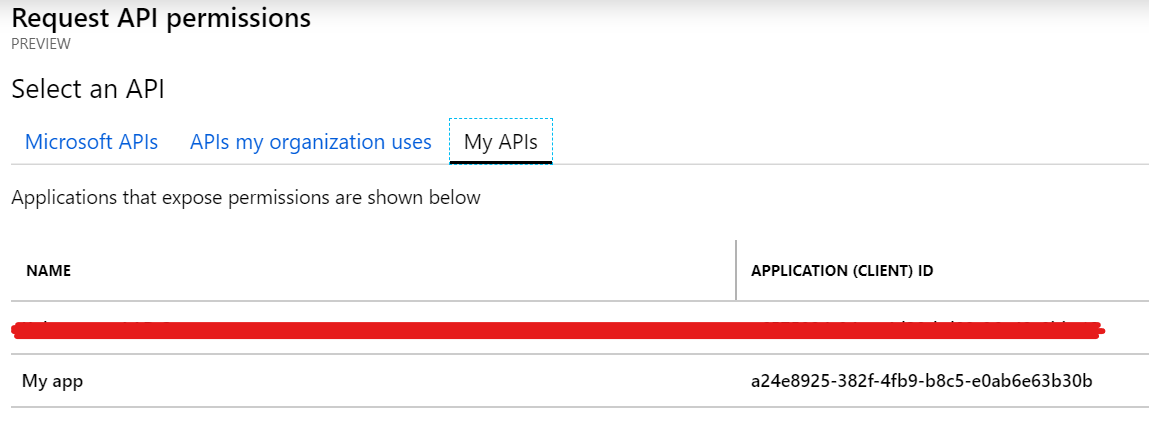
Choose your application and you should be presented with a form to actually select what kind of permission your client needs - this is where the scopes come in.
Click Add permissions and you are ... almost good to go. Notice the part in the image below under Admin consent required? It says Not granted!
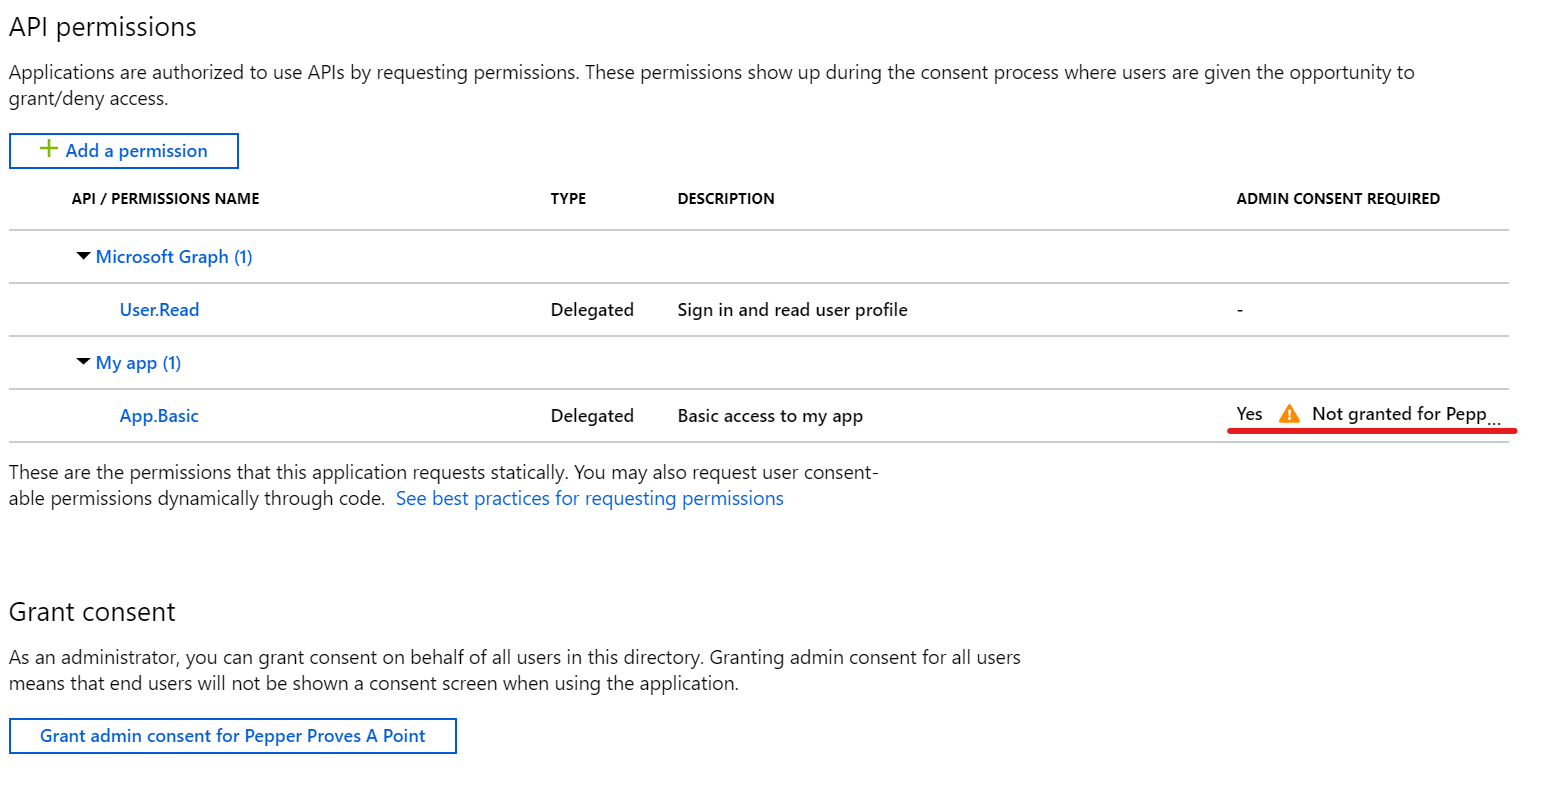
As the application administrator (specific role in Azure AD) or global admin, you can now click Grand admin consent for <your organisation>.
If you don't have this access you have to either allow user consent (the annoying part) or you must plead with your almighty administrator to review the permissions you with to grant and have them grant it for you.
The point of this is - you can actually request a permission to allow any application to read a user's private data, but Azure AD will require an admin to actually grant that permission. Image the result if anyone could do this themselves?
Just to make sure you know what you are doing, Azure AD will double check.

And that's it! You have now set up a basic authentication configuration for two applications and allowed one to talk to the other - at least the configuration says so. You still have to implement the actual applications.
Testing the setup
Of course, we don't have to have the applications running to test this. Because our client application is a public one, we don't need the redirect URI to actually work so we can run a tool to ask for a token just to see it in action.
There are many ways of doing this; I like command line for its efficiency so I made a tokenhelper tool.
Here I use the IDs we talked about: Application ID (one for the client and one for the server) and the tenant ID (so the tool knows where to ask for a token).
> tokenhelper -c 7dcaa904-38c8-4767-a256-e0faf8c5e378 -r a24e8925-382f-4fb9-b8c5-e0ab6e63b30b -t 46321e28-0b3f-4c90-855c-dc82f009eeb7

To sign in, use a web browser to open the page https://microsoft.com/devicelogin and enter the code CUABACQTN to authenticate.
Now, we get a device code flow because - as we said - the client is a public one and thus can't be trusted with anything. So, we are asked to go log in.
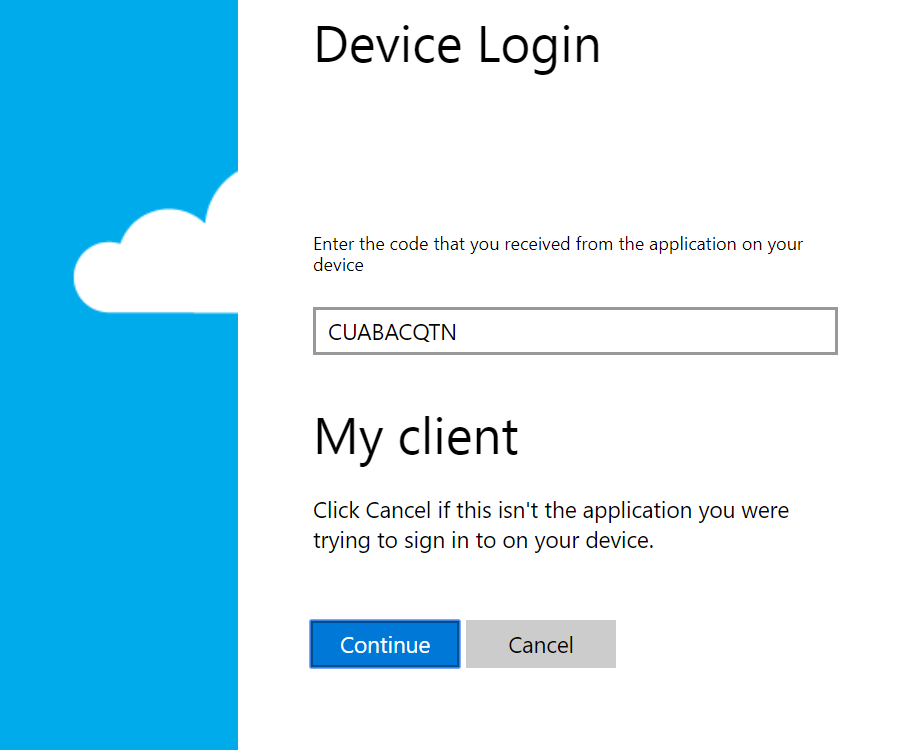
The browser redirects you to log in with your account and redirects. The tool keeps polling until it gets a reply and returns with a brand new access token.
> tokenhelper -c 7dcaa904-38c8-4767-a256-e0faf8c5e378 -r a24e8925-382f-4fb9-b8c5-e0ab6e63b30b -t 46321e28-0b3f-4c90-855c-dc82f009eeb7

To sign in, use a web browser to open the page https://microsoft.com/devicelogin and enter the code CUABACQTN to authenticate.

eyJ0eXAiOiJKV1QiLCJhbGciOiJSUzI1NiIsIng1dCI6Ik4tbEMwbi05REFMcXdodUhZbkhRNjNHZUNYYyIsImtpZCI6Ik4tbEMwbi05REFMcXdodUhZbkhRNjNHZUNYYyJ9.eyJhdWQiOiJhMjRlODkyNS0zODJmLTRmYjktYjhjNS1lMGFiNmU2M2IzMGIiLCJpc3MiOiJodHRwczovL3N0cy53aW5kb3dzLm5ldC80NjMyMWUyOC0wYjNmLTRjOTAtODU1Yy1kYzgyZjAwOWVlYjcvIiwiaWF0IjoxNTU0MzA3MzcyLCJuYmYiOjE1NTQzMDczNzIsImV4cCI6MTU1NDMxMTI3MiwiYWNyIjoiMSIsImFpbyI6IkFTUUEyLzhLQUFBQUl1NlVRZWRvdXVHVisvWVYrL09nOE85eGhIM0ZBTlNZS2FWQSttZU1RaGs9IiwiYW1yIjpbInB3ZCJdLCJhcHBpZCI6IjdkY2FhOTA0LTM4YzgtNDc2Ny1hMjU2LWUwZmFmOGM1ZTM3OCIsImFwcGlkYWNyIjoiMCIsImZhbWlseV9uYW1lIjoiQnVubnkiLCJnaXZlbl9uYW1lIjoiVGVzdCIsImlwYWRkciI6Ijg1LjE2NC4xODYuMTgxIiwibmFtZSI6IlRlc3QgQnVubnkiLCJvaWQiOiJmYzE5MTVhMS01MDA4LTQ3NGUtOWNjYS1hZTczY2QwNGMzZjkiLCJzY3AiOiJBcHAuQmFzaWMiLCJzdWIiOiI0QmZZV3BySnRKZmFucHdJWW9pbjl1OF9CV3FWdmFJRDhXMFZ0cGFQWGVNIiwidGlkIjoiNDYzMjFlMjgtMGIzZi00YzkwLTg1NWMtZGM4MmYwMDllZWI3IiwidW5pcXVlX25hbWUiOiJ0ZXN0QHBlcHBlcnByb3Zlc2Fwb2ludC5jb20iLCJ1cG4iOiJ0ZXN0QHBlcHBlcnByb3Zlc2Fwb2ludC5jb20iLCJ1dGkiOiJEaVdiZ0J4LTVFaXUtaFVIeUVrc0FBIiwidmVyIjoiMS4wIn0.CGR38gvpo6zR7BgaHL06raK8Txk1WEKxye4G_mZzIuxC2epNXyCTPI3ibb5rroD7_WPPUiswOAncHo_5xY7D8u9RkiU8nGNFLgWIrULGkoloOnwcOnxe9UGKaKDwXOD4aKNIZ3m9qJMsrXEZO6LTtCK77r6H_lGhFvUCy-OLYyxQxvw1mwCpVYXCgSAg9OGP1OdIORNA_QPtYSTr8yHGCAOcqgjLT-VhL-Phnjn-170ozlLPTrJJhjnaeTn6i-Y8zyqRYqdyJ6Zisdji_RmlZlPOQnbfLzSm9kixqmLgy0vbN6DbP7R1Bj-isESCCWhxRq-NEbpqT3WC1_xNUkJRaw
If we inspect this token, we can see our audience which should be our app, our test user and our scope (App.Basic):
{
  "typ": "JWT",
  "alg": "RS256",
  "x5t": "N-lC0n-9DALqwhuHYnHQ63GeCXc",
  "kid": "N-lC0n-9DALqwhuHYnHQ63GeCXc"
}.{
  "aud": "a24e8925-382f-4fb9-b8c5-e0ab6e63b30b",
  "iss": "https://sts.windows.net/46321e28-0b3f-4c90-855c-dc82f009eeb7/",
  "iat": 1554307372,
  "nbf": 1554307372,
  "exp": 1554311272,
  "acr": "1",
  "aio": "ASQA2/8KAAAAIu6UQedouuGV+/YV+/Og8O9xhH3FANSYKaVA+meMQhk=",
  "amr": [
    "pwd"
  ],
  "appid": "7dcaa904-38c8-4767-a256-e0faf8c5e378",
  "appidacr": "0",
  "family_name": "Bunny",
  "given_name": "Test",
  "ipaddr": "85.164.186.181",
  "name": "Test Bunny",
  "oid": "fc1915a1-5008-474e-9cca-ae73cd04c3f9",
  "scp": "App.Basic",
  "sub": "4BfYWprJtJfanpwIYoin9u8_BWqVvaID8W0VtpaPXeM",
  "tid": "46321e28-0b3f-4c90-855c-dc82f009eeb7",
  "unique_name": "test@pepperprovesapoint.com",
  "upn": "test@pepperprovesapoint.com",
  "uti": "DiWbgBx-5Eiu-hUHyEksAA",
  "ver": "1.0"
}.[Signature]
And that's it! As I've mentioned, this is only the tip of the iceberg, but hopefully should get you going.
If you are developing a SPA or such, I would recommend looking into implicit flow and how to enable that (this post is already long enough, I think).